
If you ever want a closer look at how water behaves or you simply just want to animate water, then a water simulation is the best way to go. In Blender, its water simulation is an easy method to visualize how water flows and interacts with other objects while a boundary is enclosing it. Its simulation also mimics real-life fluid flow with Blender’s fluid simulation feature.
Water simulation in Blender requires the use of a Domain object as the boundary and a Flow object as the source of water. If you want additional objects to interact with the water, you will also need an Effector object but this is not required. After setting up these objects, you’ll proceed with testing the simulation and changing its properties. Lastly, you will position the camera as to how you want your animation to look before finally rendering your animation.
In this article, you’ll have a comprehensive step-by-step guide on how to do a water simulation in Blender. You will also read about additional water simulation reminders perfect for beginners like you.
Step-by-step Guide For Water Simulation
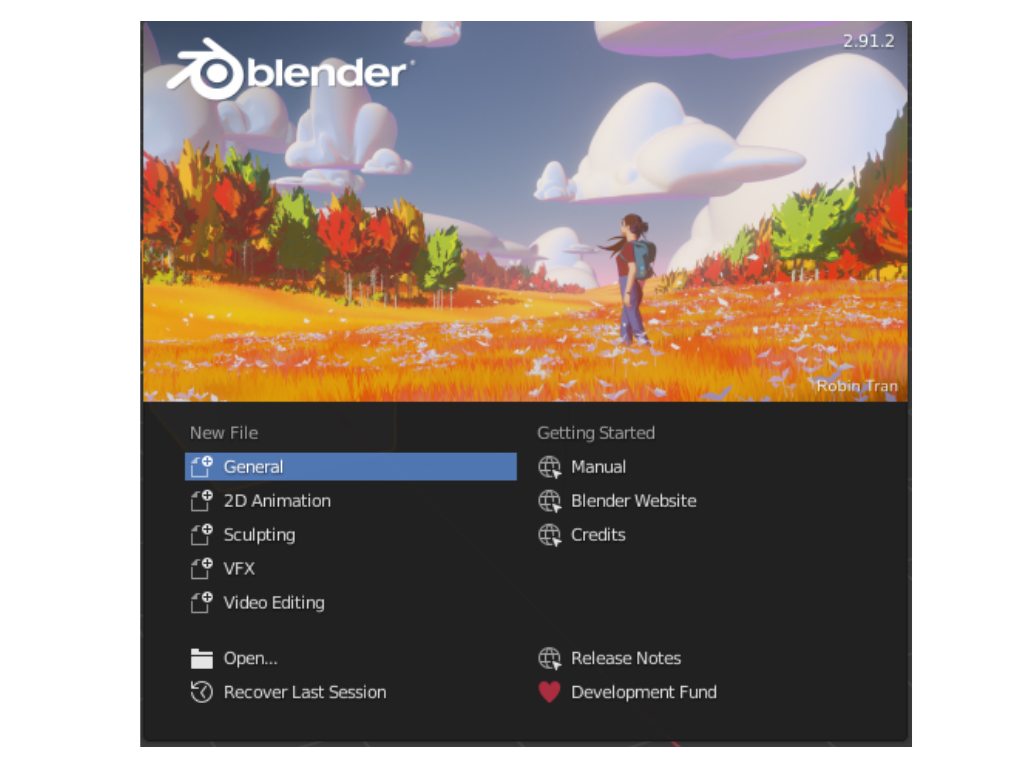
To start your first water simulation, you can select “General” under New File. This will be shown once you open the Blender application. We will begin the water simulation by creating the necessary objects for your scene.
Creating The Domain Object
The Domain object is an important part of your water simulation. It is the object in your viewport that defines the bounds of your water flow. To better visualize this, imagine simulating water that is moving inside an aquarium. You will need a rectangular box as your Domain object for this simulation. Every water simulation in Blender requires the use of a Domain object to always contain the water regardless of its flow behavior.
When creating the Domain object (or simply the Domain), you must start with the basic structure of your object. Looking back to the previous aquarium example, you will need a cube as the starting object for your Domain. After this, you can proceed on making necessary adjustments in its height, length, and width such that its overall 3D appearance resembles a tall rectangular box similar to an aquarium. Now that you finally understand what a Domain is, here’s how you can create it.
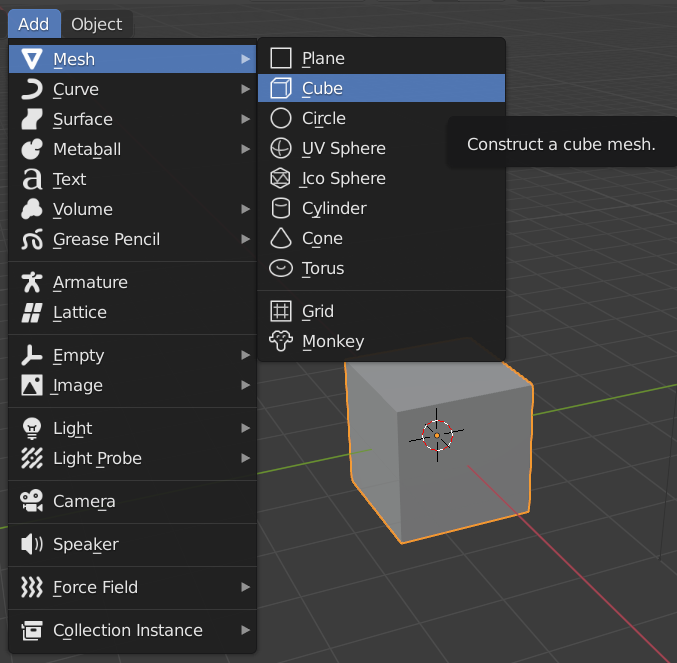
You can start with the cube that is present once a new file is opened. But if you want a different object as a starting point for your Domain, just delete the cube and then click “Add”. Select “Mesh” from the choices and then choose the shape of the object that you will need.
Once you have an object for your Domain, you can scale, resize, and move this object until you achieve your desired model. Then, go to the “Physics Properties” tab and select “Fluid” in the “Enable Physics for:” section. Select “Domain” in the “Fluid” section that will appear. After selecting this, the “Settings” section will appear and then select “Liquid” in “Domain Type”.
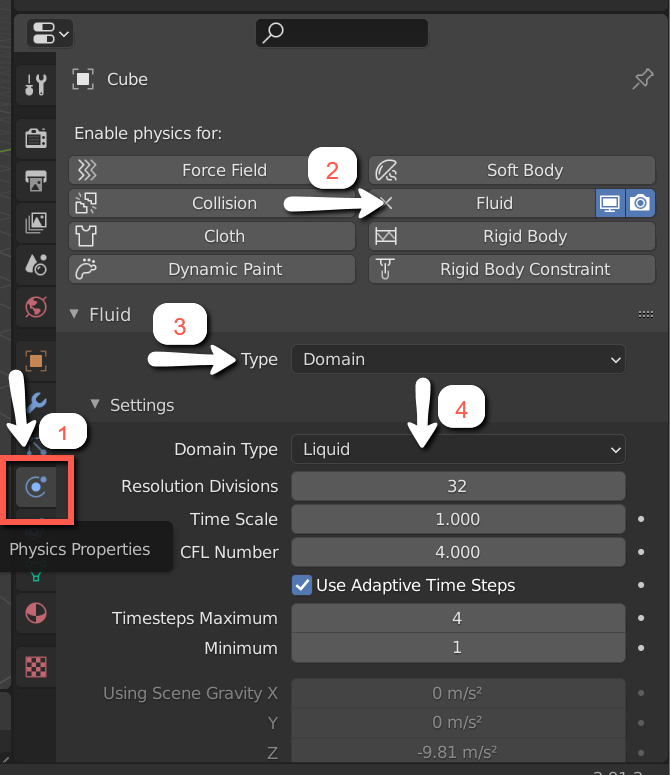
In the “Resolution Division”, set the number to 32 first. This is for faster loading time during the testing part of your simulation later on. But if you’re done with testing and already satisfied with the simulation, you can always increase the resolution for better details in your output. Take note that a higher number in the “Resolution Division” corresponds to a better resolution but also a longer baking time.
Lastly, go to the top right corner and select “Viewport Shading: Wireframe” to make the surface of your Domain transparent which lets you see the inside of the object while working on the next steps.

Setting Up The Flow Objects
After creating the Domain, you can now proceed with setting up the Flow objects. Flow objects can be the source or the outlet of water inside the Domain. In simpler terms, a Flow object is where water enters or leaves. For example, you can create a water inlet in a rectangular box by placing a spherical Flow object on its inner surface. This makes it seem like water is flowing inside the box through a hole.
You can use more than one Flow object for your simulation. Just like the Domain, you can use any shape for Flow objects. You can also move and resize these objects as long as they are contained inside the Domain.
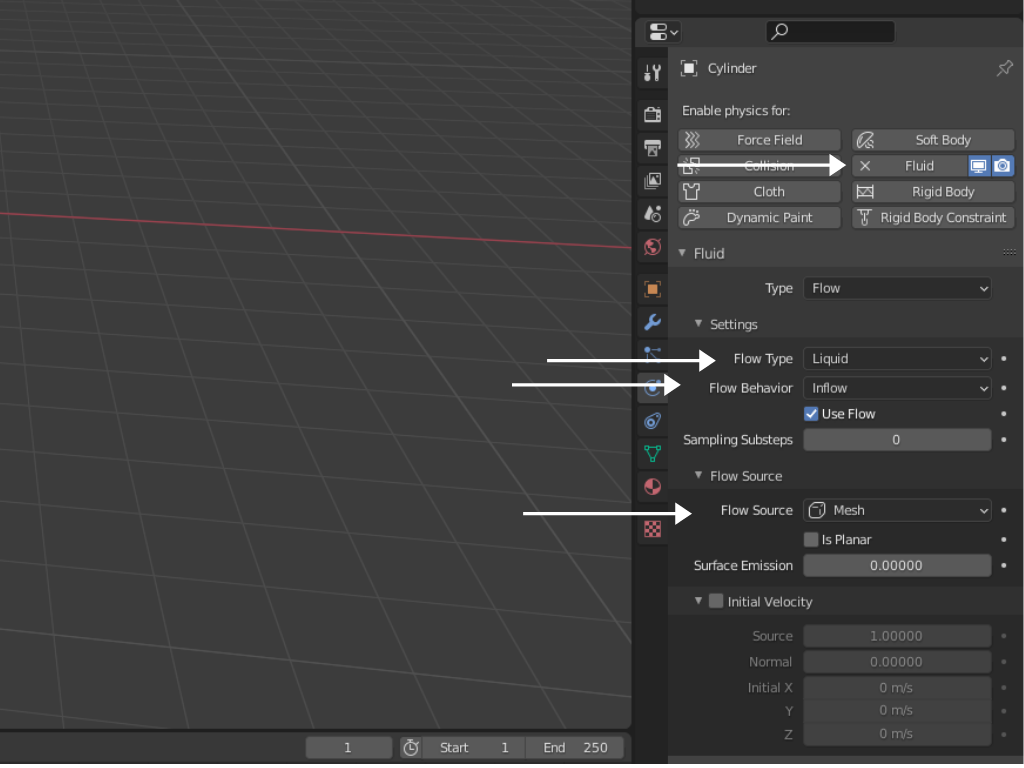
To start creating the Flow object, you must click “Add” and select “Mesh” then choose the shape that you want. Go to the “Physics Properties” tab and select “Fluid” in the “Enable Physics for:” section. In the “Fluid” section, select “Flow”. The “Settings” section will appear and then select “Liquid” in “Flow Type”. Choose how you’d like the water to flow in “Flow Behavior”. In the “Flow Source” section, you can change the settings to set an initial fluid velocity. You can also change the position and direction of the water as it is being emitted by the Flow object. If you don’t change these settings, the water will simply fall directly below the Flow object.
The Different Types of Flow Behaviour
As previously mentioned, you can choose the water flow behavior shown by the Flow object. There are three types of water flow behavior namely inflow, outflow, and geometry. Because of the differences in how each Flow object can behave, each Domain can have multiple Flow objects. For example, you can have a rectangular box with both a water inlet and a drain inside.
For an Inflow behavior, the Flow object will basically emit the water inside the Domain. This can be likened to an open faucet spilling water inside a container. On the other hand, Outflow behavior allows the Flow object to remove the water inside the Domain. It behaves similar to a drain or a leak in a water container.

Lastly, selecting Geometry in the “Flow Behavior” allows the surface of the Flow object to be converted into the actual fluid. If you choose a sphere for the Flow Object, it will turn into a ball of water.
Setting Up The Effector Objects
The Effector objects are optional additions to your water simulation. They make the simulation more interesting to look at because Effector objects interact with water flow. They can hinder water movement just like a rock against the flow of water in a river. Or they can influence the flow of the fluid just like a propeller. You can also use any shape for Effector objects.
To set up an Effector object, you need to click “Add” then “Mesh” and select the object shape that you want to use. Proceed to the “Physics Properties” tab and then select “Fluid” in the “Enable Physics for:” section.
In the “Fluid” section, select “Effector”. After this, the “Settings” section will appear, and then in “Effector Type” choose how you want the Effector object to interact with water.

The Different Types of Effector
In general, there are two types of Effector objects: Collision and Guide.
Effector objects that are Collision type hinder fluid flow upon impact. For example, using a cube as a Collision-type Effector object will block the water that approaches the object inside the Domain. When you use this, you can expect that there will be water splashes upon impact.
Meanwhile, Guide-type Effector objects can affect fluid flow velocities. This lets you add moving objects, unlike the Collision-type Effector objects. An example of this is using an Effector object to change the velocity of water as soon as it comes in contact with the object.
After creating all the necessary objects, let’s now proceed with working on how the simulation will look as a whole.
Caching and Testing The Simulation
When the scene for your simulation is complete, caching should be the next thing to do. To do this, click the Domain object and proceed to “Physics Properties”. Then, navigate to the “Cache” section and click the folder icon. On the new window that will appear, make a new folder for your project.

Under the Cache section, select “Modular” on the dropdown menu for “Type”. The Modular setting allows you to bake the data first before baking the mesh. After selecting this, scroll to the “Settings” section and click “Bake Data”.


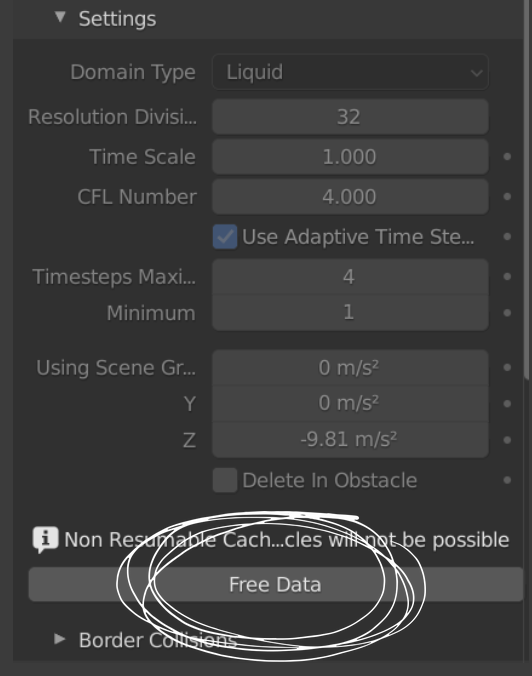
Once the baking process is finished, you can play the animation and you will see that the particles are already flowing like water in your simulation. If you are not satisfied yet with the current simulation and you’d like to add new changes such as changing the position of objects, just click “Free Data” under the “Settings” section first and then proceed with moving the objects. After applying the desired changes, click “Bake Data” again and wait for the baking to finish.
Adding Mesh To Liquid Properties
Each baking of data allows you to test the movement of the water particles in your simulation. Once you have achieved your desired result, it is time to add the mesh to the particles. This mesh covers or wraps around the entire surface formed by the particles making them appear more fluid-like.
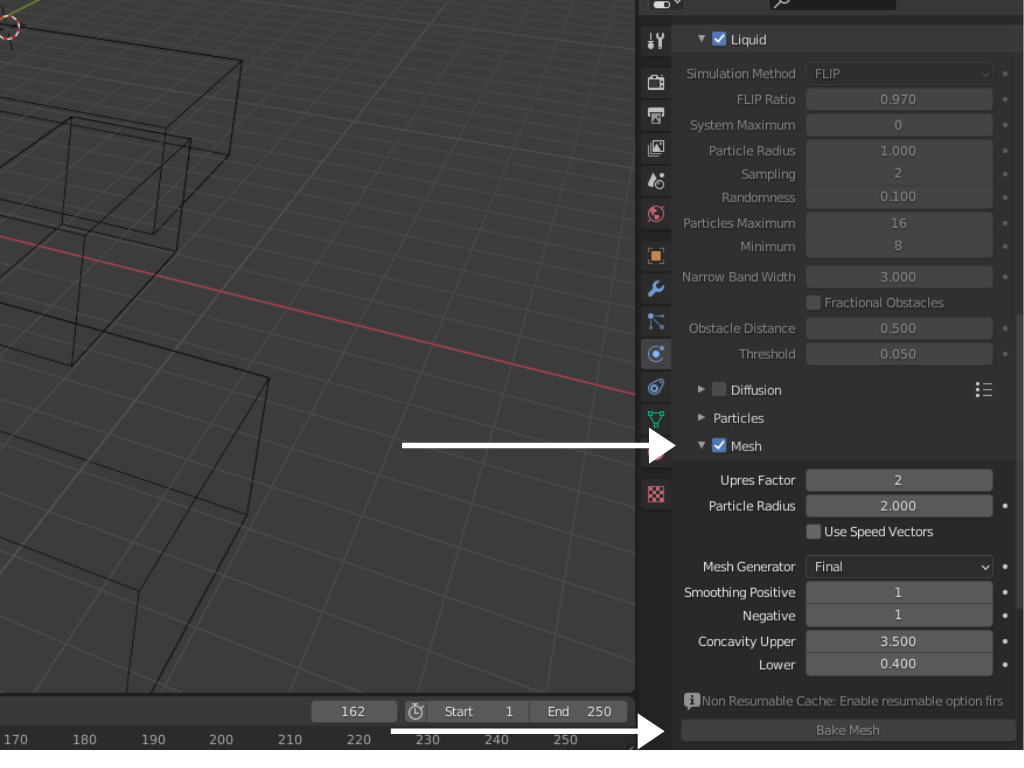
To do this, select the Domain object again and go back to “Physics Properties”. Scroll down until you find the box for “Mesh” and then enable it. Below this section, click “Bake Mesh” and wait for the baking process to finish. Play the animation to see that the liquid particles are already replaced with fluid in your simulation.
Changing Render Properties
The next step is changing the render properties and this lets you enhance how the rendered simulation will look. You can do this by going to the top right corner and selecting “Viewport Shading: Rendered”. After this, you will observe that your viewport is no longer in wireframe mode.

Next, go to the “Render Properties” tab on the column to the right and look for the Render Engine option. Choose “Cycles” in the Render Engine dropdown menu. The use of the Cycles Render Engine makes your simulation more realistic due to producing mathematically correct material and light behavior in the fluid. Wait for the rendering process to finish.

Changing The Lighting and Background
You might also want to change your lighting and background color before finalizing your water simulation. To change the lighting settings, select the lighting icon first. Move it around anywhere you want the light source and you can change the angle of the light as it hits the fluid. You can also enlarge the lighting icon. A bigger radius of the lighting icon will also result in more reflected light.
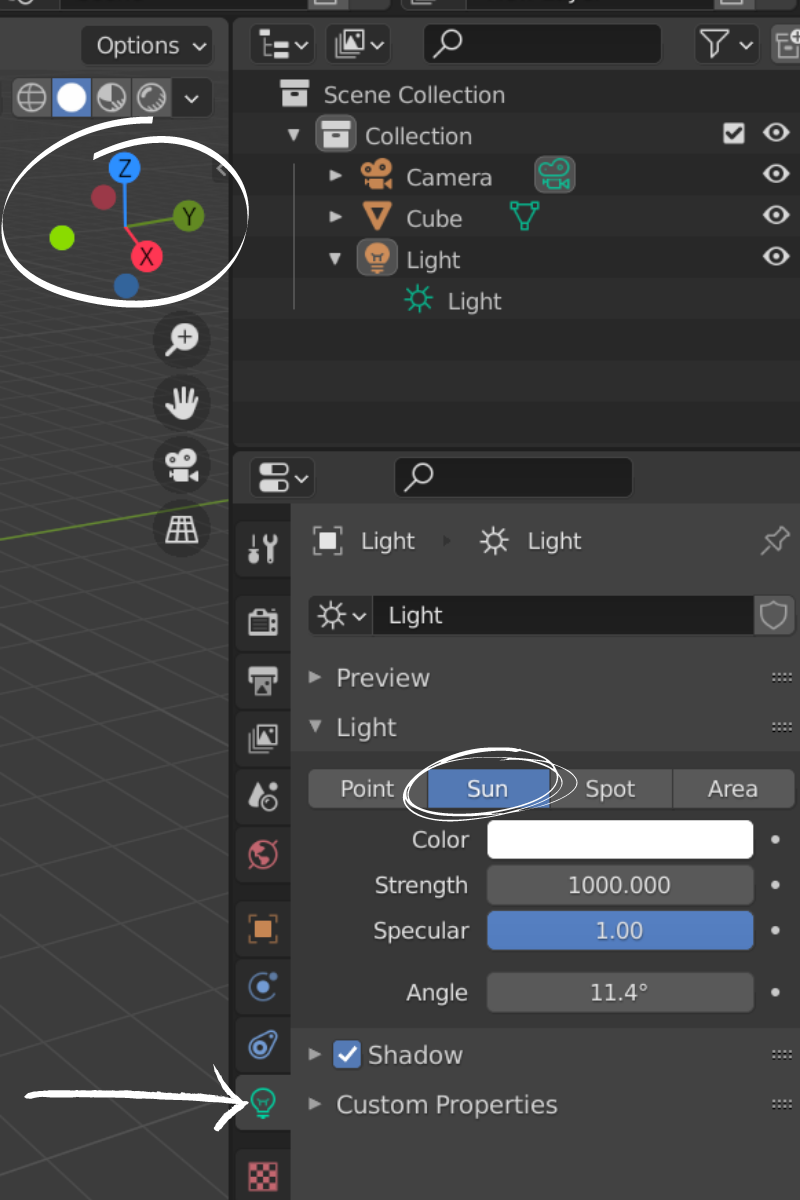
To make the simulation more realistic, it is better to make it seem like the sun is the light source. To do this, proceed to the Light Properties tab and select “Sun”. Then wait for the rendering process to finish.
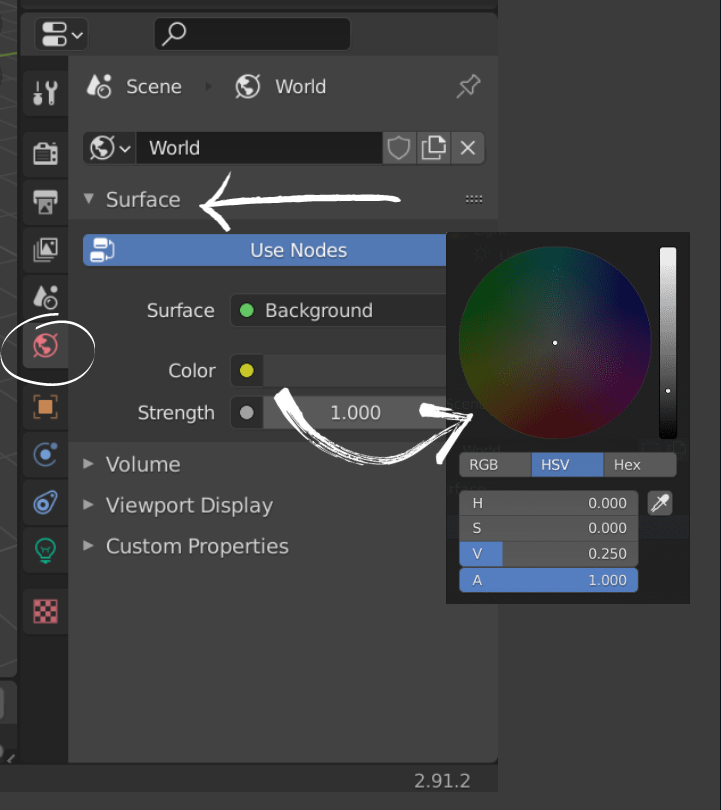
For the background color, you just need to go to World Properties and then choose the color that you’d like. After this, wait for the rendering process to finish.
Positioning The Camera
At this point, you are almost done with your water simulation. Everything seems final already but there’s another vital thing that must be always considered in animation – the camera view. You will need to position the camera in such a way that it captures the desired perspective for your audience.
Navigate around your simulation to look for the best spot where you’ll want your camera view. Press Ctrl + Alt + 0 to show the camera view. You can adjust the view to achieve how you’ll like your animation to appear in your final output. Make sure that each frame of the simulation is within the camera view.
To check the appearance of a single frame in the camera view, press F12. After this, you can finally increase the resolution to add more details to your water simulation.
Rendering The Water Simulation
The last step for your water simulation is rendering it in Blender. This is a quick and easy final step but you need to save first your Blender file by going to the File tab and then click “Save”. After this, go to the Render tab at the top left corner of the window and select “Render Animation”.
Additional Tips For Beginners
Water simulation in Blender can get a bit overwhelming especially to beginners. Here are some helpful reminders to help you get through your first water simulation with ease.
The initial step in creating a water simulation is setting up the scene and this includes creating your Domain, Flow objects, and even Effector objects. To make this easier for you, you can use a background image to help you in structuring every object. When you’re done and before rendering, you can just delete the image.
Make sure that your Domain object is large enough to contain everything you want for your water simulation. Its structure should be enough to contain the splashes or any movement of the water. Take note that the Domain object will usually appear like an invisible wall in your animation.
As soon as you have successfully created the Domain, make its surface transparent before proceeding to the next steps. In this way, you can easily position other objects inside the Domain object and view the fluid flow too.
Try to practice the use of shortcut keys for your own convenience. The basic shortcuts that you can use for your objects are G = free Translate/Manipulate (X, Y, and Z to lock axis), S = free Scale/Resize (X, Y, and Z to lock axis) and R = free Rotate (X, Y, and Z to lock axis).
Before baking the data, try to recheck everything and apply the necessary changes you want to your objects. This saves you time for multiple baking and freeing of data. Once the baking of data is done, you constantly need to free the data first before making some changes.
You can only change the liquid properties after baking. Prior to baking, all you have are data that is not yet considered fluid. You cannot change how the water will look if you haven’t baked the data and mesh first.
Although you want your domain to be large enough, always try to use the least possible size. As the Domain object becomes bigger, the longer the simulation needs to render. If you want to save time but also want your animation to appear bigger, just zoom in on the camera view before rendering.
Conclusion
Blender once again proves itself to be reliable in producing advanced animations like water simulation. Regardless if you are a beginner, you can easily simulate water in Blender because it is pretty much a straightforward process. You just need to establish the scene using Domain, Flow, and Effector objects followed by testing the simulation and changing its properties as well as the camera position. After these, you will just need to render out your water simulation. Of course, there will be technicalities but this guide is specially designed for beginners to help you get through your first water simulation. Through this comprehensive guide, I’m sure you will finish your simulation in no time and without having much to worry about.