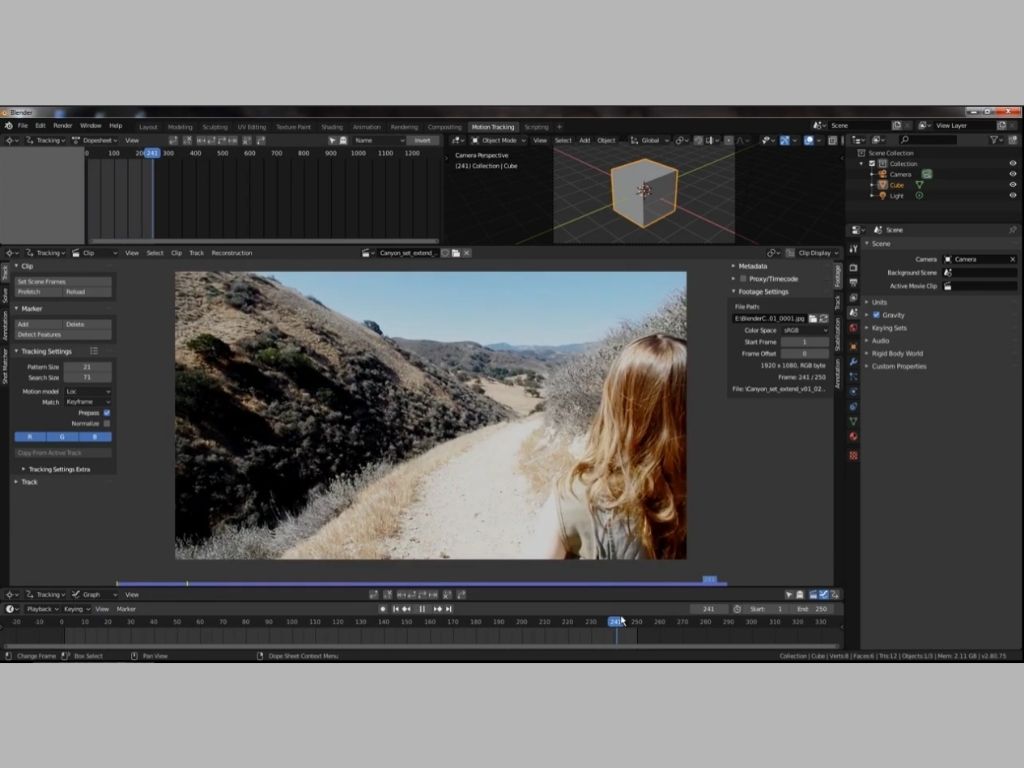
Camera tracking means extracting the path taken by the actual camera that was used to take the shot. This path can then be used to let you add an object to your video footage while making it appear realistic as it goes along the camera path. In short, the object’s animation in the scene corresponds to the extracted camera path.
There are multiple add-ons that you can use while camera tracking in Blender. You can opt to install add ons related to the adding of cameras, the scene lighting, importing of objects, and even for the tracking itself. Through these addons, your work can be more efficient and less time-consuming.
This article is part of a multi part ongoing series about anything Blender.
Check out any other articles in Mount CG’s dedicated Blender section.
Addons for Cameras
An important component in camera tracking is the camera. Once a camera trajectory is extracted, the data will be transferred to a camera in Blender in order to set up a scene. There are various available add-ons that can help you with adding single or multiple cameras and also for the processing of data from the image sequence.
BLAM, Real Camera, Shot Manager, Shotlist, Quake Motion Camera Shake, QuickShot, Cablecam, and Render Burst are my suggested addons for this.
Addon 1: fSPY

The first one on our list is fSPY. This add-on is very useful in calibrating 3D cameras in Blender. It can reconstruct the camera to match the angle and perspective based on an image. Knowing that camera tracking works with image sequences, then this add on can be easily used.
This helps when initially setting up the 3D camera in your scene. When importing an object, you’d want it to appear with the same focal length and angle as the original shot. This add-on can make your animations more realistic by applying calibrations to your 3D camera.
Addon 2: Real Camera

If you have experienced using a camera in real life then you’d know that it has various settings that you could adjust. This add-on lets you do the same thing with Blender’s camera.
Real Camera allows you to easily control real camera features such as aperture, shutter speed, focal length, auto exposure, and autofocus. The auto-exposure feature adjusts the brightness of the scene while autofocus adjusts where the camera should focus based on the camera’s center.
You can increase the aperture to create a sharper image or change the shutter speed to produce a motion blur effect. Overall, this addon lets you save time in making final adjustments to your camera.
Addon 3: Shot Manager

This add on is great if you want to work with multiple video files but want to save it in a single file. When camera tracking, you might want to work on various footage that can be connected with each other. Shot Manager helps in speeding up rendering time for this kind of project.
Through this addon, you can also choose to save frame ranges from multiple files and render all cameras that were used. It also helps in organizing your shots without saving them in different files. For projects that involve complex rendering, this addon can also help by separating complex render set-ups.
Addon 4: Shotlist

Shotlist is another add-on that helps you save time. It helps you manage and navigate through your camera shots and change cameras. Navigating through shots will be easier because it can quickly add new shots, rename, and remove shots. It can also change the camera being used for each scene anytime, and even hide inactive cameras to make everything more organized.
This is perfect for projects that need frequent changing of cameras. Its features include adding new shots, removing all or individual shots, jumping to the next or a specific shot, indicating shot duration, showing the camera name, and locking all shots.
Addon 5: Quake Motion Camera Shake
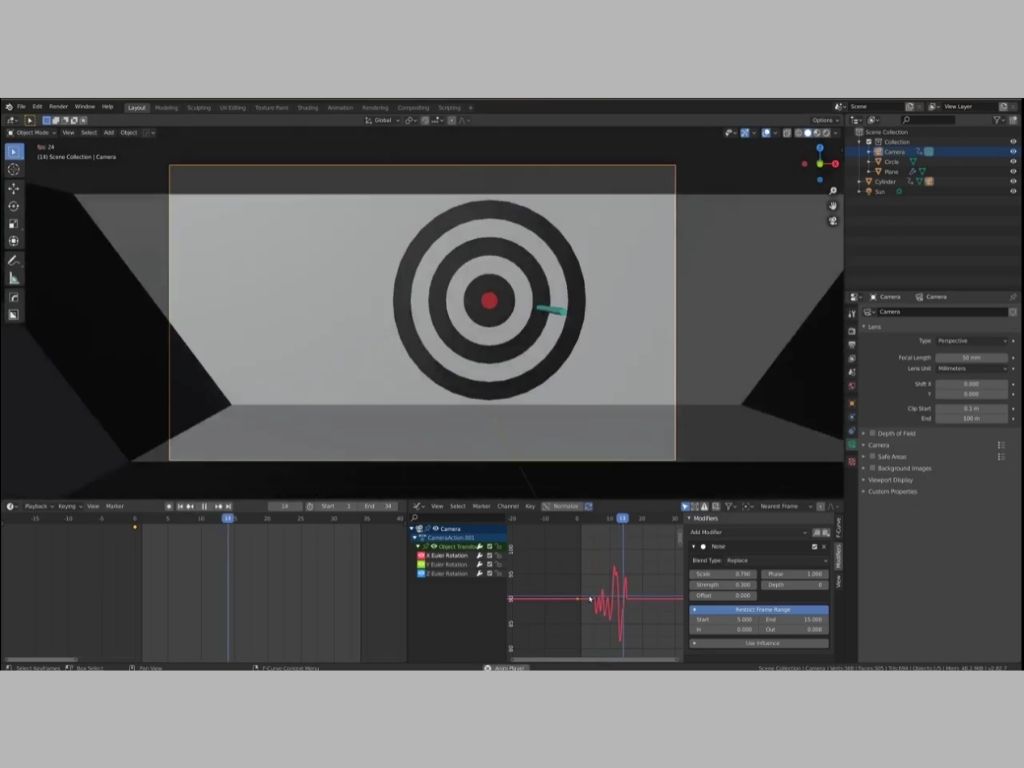
You can use this addon if you want to add additional motion aside from the extracted camera path in your footage. It can incorporate flight, waving, and tilting movements to your Blender cameras. This can make your camera shots appear more realistic.

It also has multiple camera tools that are easily accessible through a few clicks. This addon includes tools for camera shake, camera switcher, and camera motion.
It also has a set of presets which can all be accessed from its menu like the Pan Camera for flight shots, Racing Camera for moving objects, Handheld Camera for human-like motion, and Head Camera for first-person perspective.
Addon 6: Camera Manager

Camera Manager is one of the best add ons when it comes to adding multiple cameras and their markers in your scene. You will need this especially if you want to have multiple camera tracks. You can have each camera locked to a single object separately. It is also perfect for adding and locking a camera to a certain position.
Addon 7: QuickShot

QuickShot is a unique add-on that lets you add animations from multiple cameras and then stack them on top of each other to form a single animation. These animations can be sourced from the camera tracks you’ve previously extracted.
This addon is perfect for crowded scenes or those with multiple animated objects. It also allows you to change the duration and order of your camera shots. Some of its features include the use of multiple cameras that each captures a single shot, the setting of in and out keyframes, and allowing camera motion to ease in or out at a certain rate.
Addon 8: Cablecam

This addon is a bit similar to Quake Motion Camera Shake because it also allows the adding of additional camera movement. To be specific, it adds cinematic sweeping camera moves.
You can choose where your camera is positioned and then you can rotate its horizon. It can also add slow tracking of objects for a more cinematic effect.
What makes this add-on great is that it applies movements that seem natural. It uses the three-axis control system minimally and instead relies on correcting the horizon with rotation control.
Addon 9: Render Burst

Another addon that is useful for setting up multiple cameras is the Render Burst. It also lets you save up a lot of rendering time by allowing you to render all cameras at the same time. This is best used in combination with another addon that allows the addition of multiple cameras. But it can also be set to a mode that renders all cameras one by one.
Addons for Tracking
Tracking can be a bit difficult especially if you have poorly recorded video tracks. But no worries because there are useful addons that can make your camera tracking work a lot easier.
Here are my top picks: Refine Tracking Solution, Autotracker, Resolve Camera Track, and Voodoo Camera Tracker.
Addon 10: Refine Tracking Solution

During camera tracking, you will surely have multiple camera tracks and not all of these tracks will be good ones. To turn them into good tracks, you need to narrow down the solve error manually which can be difficult especially if you have multiple camera tracks. But this add on will definitely help you in this issue.
The Refine Tracking Solution addon will automatically set the weight of each track according to its error. The track weights determine how each track will affect the animation. Through this addon, you will also be able to view the error of each track.
Addon 11: Autotracker
A very useful add-on in camera tracking is the Autotracker. This addon automatically creates tracking points for your footage and then tries to prevent the generation of bad tracks. Bad tracks are those with a solve error value of more than 1. However, this addon is best used on footage that is not too complicated such as aerial and wide dolly shots. It is also simple to use and can be a great help when used together with manual tracking.
Addon 12: Resolve Camera Track
Without any addons, Blender’s tracking is limited to a single camera angle. The Resolve Camera Track combines tracking points made from multiple cameras and resolves them into one scene. It does 3D point reconstruction from multiple camera angles to achieve this.
Another advantage of this addon is that it can turn 2D motion tracks taken from different angles into a 3D motion track. This can be a great tool when paired with other addons that allow the addition of multiple cameras.
Addon 13: Voodoo Camera Tracker

Voodoo Camera Tracker is also an add-on that does automated tracking. It determines its own tracks and allows you to export the camera path and its points. This addon is said to be outdated already but because it is really useful, Blender users have found a way to import it in recent versions of Blender.
Addons for Importing Objects
One of the main purposes of camera tracking is adding objects to your scene which in turn appears realistic to your original video footage.
Although it can be tedious to manually import multiple objects, there are add-ons that you can use to make adding animated objects more efficient while camera tracking. BlenderSFM, Chordata Motion, Textools, and Asset Flinger are my recommended ones.
Addon 14: BlenderSFM (Structure from Motion)

Blender SFM is an add-on that lets you create a 3D image using multiple images. It makes use of images of an object or scene taken from different angles to construct a corresponding 3D mesh. And once a 3D image of an object is obtained, you can use the camera path to make it move realistically. This can also be used together with an addon for texture to help when baking the mesh.
Addon 15: Chordata Motion

Chordata allows you to receive, record, retransmit physical motion data. This can be useful when duplicating the motion applied to an object. What makes it fun is that it is an open source motion capture system that lets you capture movements even from your smartphone. Another plus for this addon is it is already integrated into Blender.
Addon 16: Textools

Being able to change the texture of the object that you are using also matters. Textools is an add-on that is useful for setting textures during baking. It also lets you change the color palette in your scenes easily.
This addon allows you to set the size and even the padding for the texture. It offers 16 different textures that you can use such as AO, AO Legacy, Bevel Mask, Cavity, Curvature, Diffuse, Dust, Element ID, Material ID, Object normal, Object bevel, Tangent normal, Tangent bevel, Paint base, Position, Face Selection and Wireframe. For the colors, you can copy the color palette of other images through Textools.
Addon 17: Asset Flinger
If you have multiple scenes and you want to have an object present in most of the scenes, then this addon will be a useful tool. Asset Flinger lets you import an object into other scenes easily.
This addon is perfect for those that frequently import 3D objects to their scenes. Its features include custom categories for objects, automatic thumbnail generation, and remembering your last used object.
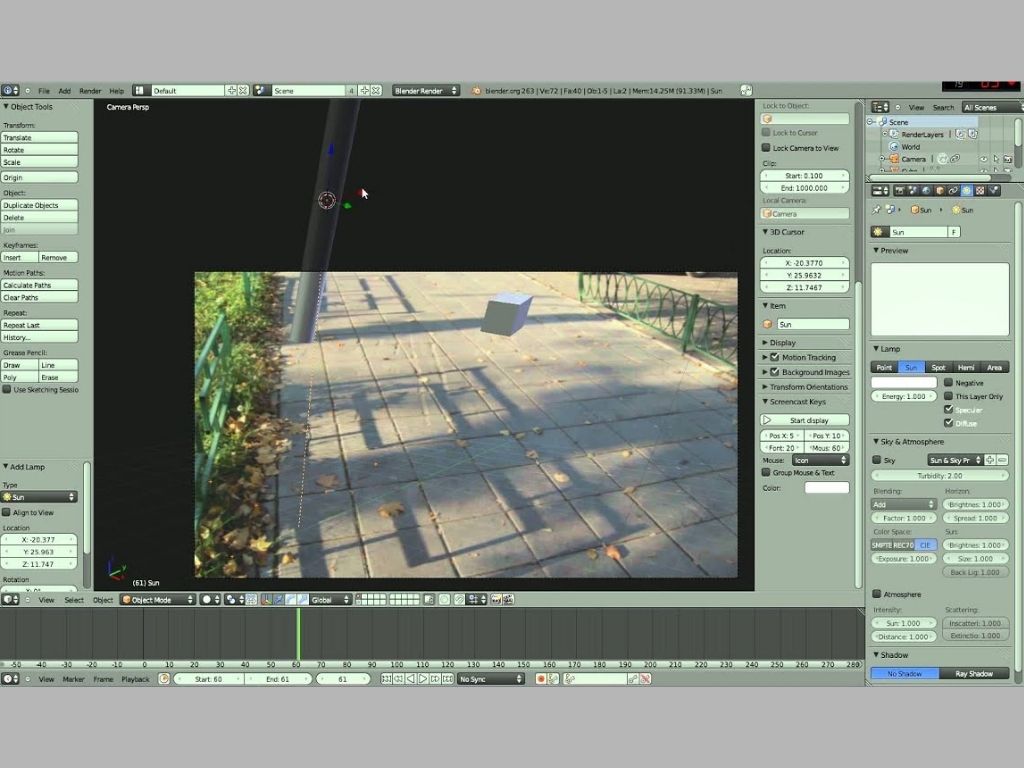
Addons for Lighting
The lighting information greatly affects the realism of your animated scene. After camera tracking and importing an object, you can use various add-ons to further improve the lighting and even the colors of the objects in your scene. Installing Gaffer, Pro Lighting Studio or Matalogue can provide great assistance to your workflow.
Addon 18: Gaffer – Light Manager

Gaffer lets you easily light up your scenes using a simple panel with all the lamp settings. Changing the lighting setting will no longer be a hassle thanks to this add-on and you will also be able to focus on more important tasks necessary.
Aside from speeding things up, this addon also helps you create better lighting output. It also has a special feature that lets you focus on the lighting of a single object in your scene without affecting the lighting of the whole scene.
Addon 19: Pro Lighting Studio
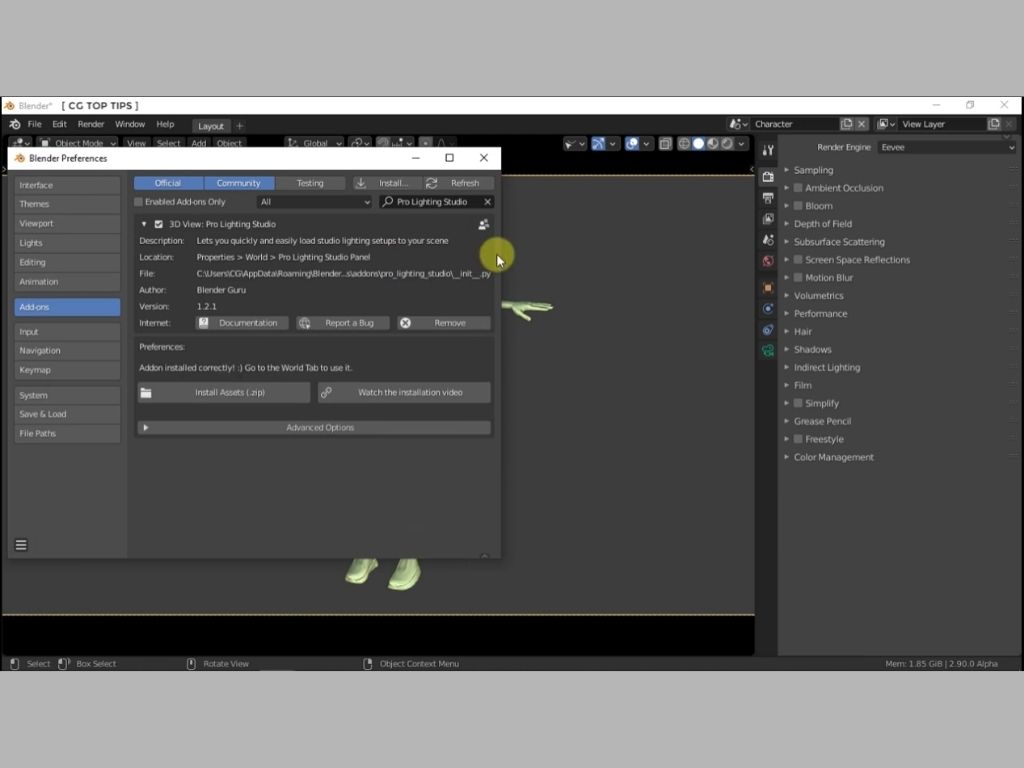
Another lighting add-on that helps you save time is the Pro Lighting Studio. It lets you create new lighting setups and also render them quickly. A bit similar to Gaffer, it can also provide studio light focus on selected objects only. It can also be used to set up reflections.
Its other features include adding an infinite number of lights and removing lights surrounding an object. Its light settings include the intensity, scale, color, and distance of the applied light.
Addon 20: Matalogue

Last on this list is the Matalogue add-on. It also allows for fast lighting adjustments. It provides easy access to all materials in an object, layer or scene, lights, and other compositing setups in complex scenes. Its access-to-all tab is located in the Node editor and it can also be used while working in multiple scenes.
How To Install Any Blender Addon
You probably have your eyes set on a couple of addons on this list. Most of these addons are from 3rd party sources and you might have problems installing them on Blender for the first time. Here’s a guide on how you can properly install any Blender addon.
Once you find your desired addon online, download its file. If it is in a zip file, you do not need to unzip and extract the files. Proceed with opening the Blender application once you have the addon file downloaded.
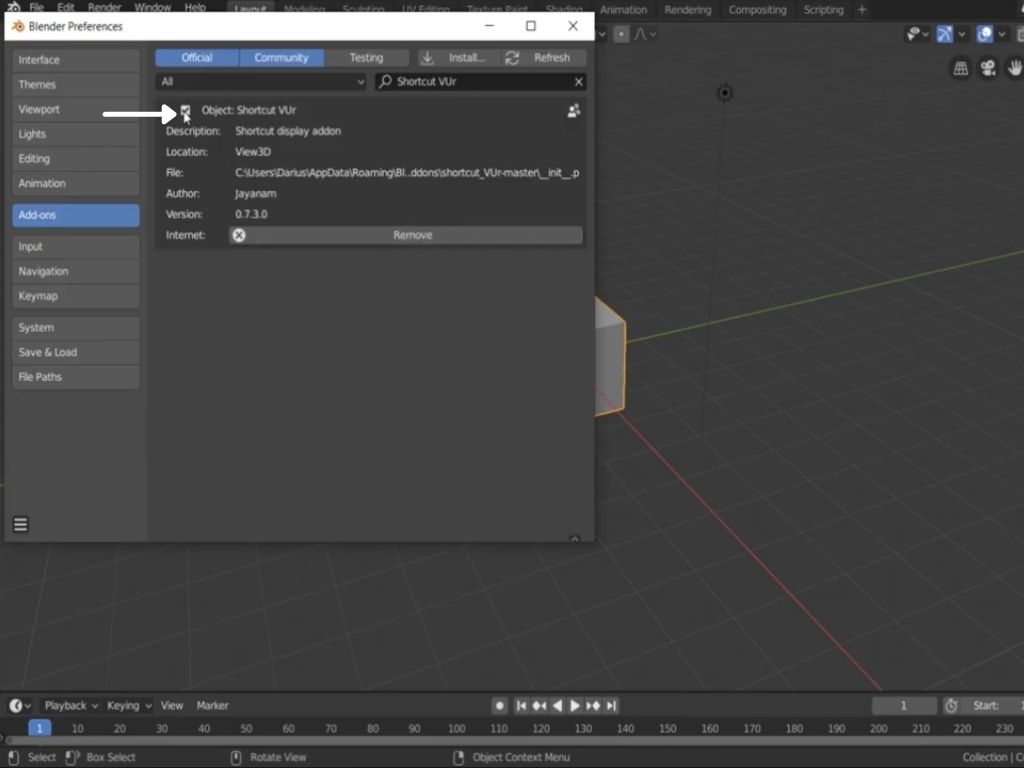
In the Blender application window, navigate to the upper left corner and select the “Edit” tab. Select “Preferences” on the drop-down menu.

A new window will appear and you will see the “Addons” tab. All built-in Blender addons and previously installed add-ons can be searched here. To look for an addon, simply type its name in the search box and enable it by checking the box beside its name. If you are going to use an addon from a newly-downloaded file, click the “Install” button.

A new window will pop up and in here, you can search for the addon file that you want to install for the first time. Select the downloaded file and then click the “Install addon” button located at the bottom of this window.

Once the addon is installed, do not forget to enable it. Search for its name and then check the box beside its name. After this, you’ll be able to use the addon in Blender while working on your project.
There is also an alternative method that you can do which is downloading the addon file and opening it in a text editor followed by clicking “Run Script”.
Conclusion
Incorporating addons to your workflow can really simplify your Blender tasks. Aside from letting you save time, they also provide an added convenience by making your work more organized. For camera tracking, you can use addons for the tracking process, the added cameras, the objects, and also, the lighting settings. The 20 addons that I mentioned in this list can help you in any way possible whenever you are camera tracking. But always make sure that the addons you want to use are properly installed and enabled in Blender before doing your work.