Rigging is a very important task in animation. It can be seen as the framework (quite literally) of animation, which is why using the perfect animation software is very important. Most animators and creators have vouched for Blender, with its wide array of capabilities, as the best animation tool for rigging. Some might be curious on how rigging using Blender actually works, and how it fares with other softwares in general.
How does rigging in Blender work? Blender makes rigging much easier with the help of its Rigify feature, meant to shorten the amount of time used in creating rigs for animated characters and making them compatible with most applications. Their features are pretty much user-friendly.
In this article, we will be discussing a step-by-step guide on how to use Blender in rigging. We will also have a short discussion about Blender, as well as some useful tips in rigging using Blender. We will also discuss Rigify, its uses, features, and some advantages and disadvantages while using Blender. Lastly, we will also discuss all the features Blender has to offer, especially in terms of rigging.
All About Blender: In a Nutshell
Free Software for Every Use Possible
Blender is an animation tool developed by the Blender Group. From the start, it has always been known as a free and open-source 3D computer graphics software toolset. This is primarily used for creating animated films, visual 3D applications, virtual reality, and computer games.
Blender prides themselves on providing free software for everyone, no matter the purpose of the project. It is mainly aimed at artists and small teams, by publicly managed projects. It is also licensed as GNU GPL, owned by its contributors — meaning Blender is free and an open source forever. It is well suited to individuals and small studios who benefit from its unified pipeline and responsive development process.
How Blender Works
Blender supports the entirety of the 3D pipeline — such as modeling, rigging, animation, simulation, rendering, compositing, and motion tracking, even video editing and game creation. It is also cross-platform and runs equally well on Linux, Windows, and Macintosh computers. Its interface uses OpenGL to provide a consistent experience. Lastly, the languages used are Python and C++.
The Many Different Uses of Blender
Many animators and creators in the animation industry share the same thought — that Blender can be considered as a one stop film software. It possesses a lot of features such as the 3D package, a compositor, a film editor, and a game creation engine as well.
Its 3D package can do a lot of things in 3D animation, such as game modeling and texturing, effects work, camera tracking, architectural walk throughout, modeling or animation for 3D printing, particle simulation, and full on 3D animations. It speeds up the rendering process by using a graphics card rather than the CPU, a process known as the GPU rendering.
GPU rendering allows modern GPUs to perform a lot of numbers crunching. Numbers crunching is a process of performing 3D calculations which are required especially for developing video games and 3D heavy applications. Other uses include creating 3D games, film animation, creating visual effects, and scripting.
Step-by-Step Guide on How to Rig Using Blender
Blender has proven itself easy to use for animators and creators, regardless of skills and computer languages acquired. Here are the basic steps on how to do a basic rigging in Blender.
Here is the first video of a nice series on how to use Rigify by my buddy Looch, who i worked with on Peter Rabbit 2. He’se a true Blender expert, so after reading this article, you should definitely go and check out his channel.
Opening a New File and Starting the Project
To start the project, open a new file and import a base model by clicking File > Import. You can use any other biped model as well. Left-click and select the model, then press Alt+G to clear the location. Please make sure that it is placed at the center. Press Shift+S and then select “Cursor to Selected”. This brings the 3D cursor to the origin of the model.


You can also import any existing model into Blender. It is much easier if you have other rigging models to begin with.
Line the Model Up
The easiest way to do this is to select all the parts of your model. Hit the 5 key on your numpad (if you have one) to make sure it will move straight. This allows the model to enter orthographic mode (non-perspective 3D, this makes this one much less like an fps camera and more like a CAD cam).


Hit the 1 key on the numpad to switch to front orthographic view. This gives you the flattest view of your character from straight on. It also makes it easier to see your feet. Then simply line feet up so the sole of the foot or the show is right on top of the red line. This ensures that the character always stays above the ground plane in Idle when Unity is running


You may experience some animation glitches in VRChat or other Unity games if you have the character halfway beneath the ground-plane.
Centering the Origins of Your Model
Make sure that the origin for the model is properly centered inside the model. Select all the model’s pieces by pressing the “A” on your keyboard then open the “Object” options then mouse over to “Set Origin” then hit “Origin to Geometry”. Make sure not to click “geometry to origins” or your model may move. You can begin the model’s rigging once the origins are centered.

Begin Rigging At The Hips
You have to start on the hips for humanoid rigs, then go up to the head and arms, finishing off at the legs and going down to the feet.
To center the 3D cursor so that we can spawn a rig where we want it, make sure the model is selected (for the avatar model only). Then, hover over the 3D viewport and hit Shift+S. Once done, a menu will pop up, then select “cursor to selection”. The 3D cursor will move right to the location of the model’s origin.

This should be right above the hips most of the time. Hit Shift+A to enter the spawn menu, then select “armature” and single bone. Go over the menu on the right hand side of Blender screen. You should see a new “armature” tab selected. Change one setting to see it go.


On the same tab (this one looks like an orange cube) check the box called “In Front” that is unchecked down under the “viewport display” dropdown. A pyramid in the middle of the character will be shown once this step is done.

You may now begin rigging the model. Move the armature down by clicking and dragging on the blue arrow until it reaches the character’s general hip area, then release.
Adding More Bones to Your Model
Hit the tab key on your keyboard to enter EDIT mode. You should see the cube in the upper left corner of the 3D view change to a cube with dots on the corners. Give the specific bone a name unique for identification. Next, click on the tab on the right hand side of the screen with a single bone in it. Type the desired name for the bone then wait for it to change.


Remember that Blender makes its bones hereditary, meaning any new bones created off of a previous bone will carry the name of the bone they came out from. For example, a second bone off the hip would be called hip.001.
Go back to the viewport for the next part, then select just the top circle of the bone (not the whole bone or it will break the rig), then hit E+Z. This step enables to extrude a new bone and lock it to only the Z axis. We can stretch it up, but not forwards or backwards or side to side. This works for bones such as the spine. Drag it up to the bottom of the chest area, then left click to release it.

Moving Right Up To The Bones Above
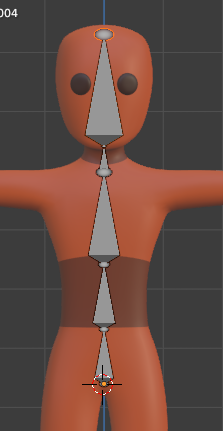
This process is for the chest, neck, and head. To do this, just keep going straight up with those bones. You should do this step even if your character is female and has a chest. For this basic rig, it will all just move with one chest bone. The head should be one big rod going all the way up through the skull.
Working On The Arms Of Your Model
Do the same thing on how you center the cursor to spawn the rig with the arms. For most models, the eyeballed shoulder placement works 100% okay. Left click where you want the cursor on the right shoulder to begin. Remember that the shoulder bone is more of a collarbone than a real shoulder, so make sure to give it some space before the start of the arm.
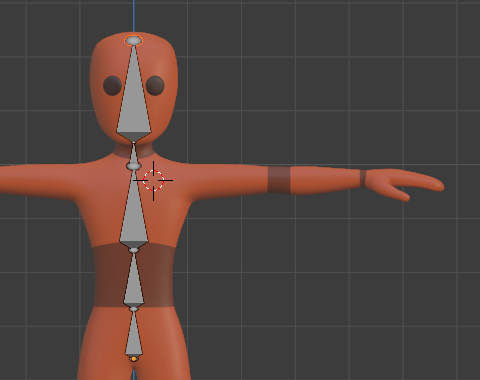
Hit Shift+A to insert the bone at the location of the cursor. To rotate the bone and move it into place, hit R and then -90 to rotate it flat to ninety degrees (see figure1). Hit 7 on the numpad. To fix the bone that is not anywhere near the middle of the arm, left click the middle of the bone, select “Move” from the toolbar menu from the left then just grab the blue arrow then drag that bone into place (see figure 2).


Try and get it as close as you can, then you need to move it in the X axis to realign it with where you originally placed at the back of the bone. To fix bones that are way too big for your model, click on the ball and the end of the bone and drag it back. The upper arm should end at the elbow, “arm” at the wrist and the hand at the point the fingers begin, or somewhere halfway to the point in the palm.

Next, hit E+X to only extrude bones in the X axis to be exact. Rename the bones, then quickly select the shoulder bone again and check the x location. Duplicate the actions. To duplicate arm bones, zoom out then Shift+left click on all the bones from the hand and then go backwards until it reaches the shoulder, then hit Shift+D.
Attached to the mouse is a copy of all the hand bones you just created. You can move your mouse around to check that you’ve copied the bones then left-click once to release them back to the original spot.
Scaling And Duplicating Your Model
You should see one set of bones currently since the duplicate is now released. The bones will have to face the other way. Hit S (for scale) and then x and -1. This will scale all the bones to be -1 times scale on the x axis only, just flipping around. They should be sitting backwards inside the original bones.
Move bones along the x axis until the number in the x box to the right is as close as you can get to the positive version of the negative number before, then click to set. Go to the armature tab located at the upper left, select “names” and then “flip names”.

The R should be seen, then it turns to L, then some numbers change if any. Do not worry much when this happens because this one is perfectly normal. Parent the bones “with an offset” to the chest.
Next, select one of the shoulders then shift+click the chest to select it, then hit Ctrl+P then select “keep offset”. A black dotted line should appear to connect the end of the shoulder with the top side of the chest. Repeat for the other side. Black lines will keep arms moving with the chest.

Working Those Legs Up
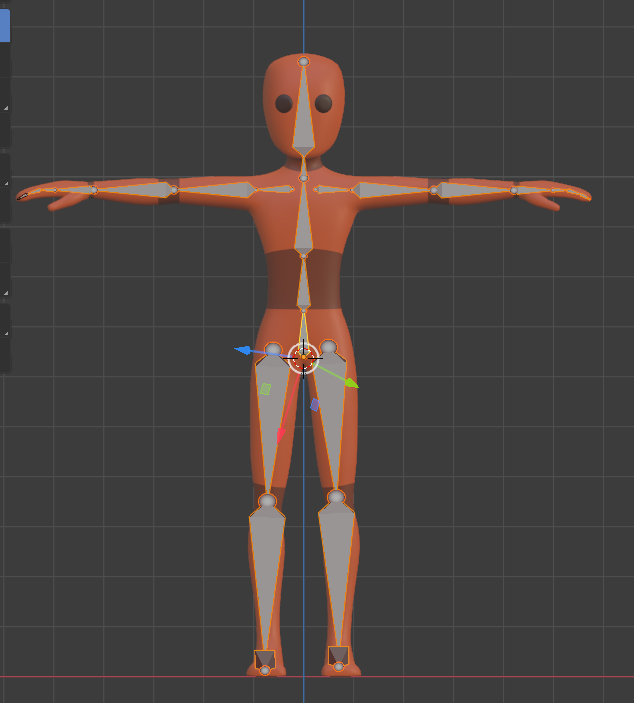
For this step, you have to eyeball the joint’s location again. Left click where you want it then Shift+A to add a bone. Rotate the bone 180 degrees by going r then 180 then enter to put it pointing down towards the feet. Drag the end of the bone wherever you want to put it specifically in the exact right location with the g key.
Write down the x value for the top leg joint, then starting from the bottom, shift select all of them up to the upper leg then Shift+D. Make sure to scale the bones to -1 in x, or you can simply begin moving the leg bones to their appropriate leg, then switch names. Select the left upper leg, then shift select and offset parent it.
Do the same for the right upper leg bone. Test if your offset parents work by using Ctrl+Tab to enter pose mode, then select either hip or chest bone and hit R to rotate.
Attachments and Finishing Touches
Finally, we should attach the mesh to the complete rig and start posing. To do that, go back to object mode by pressing Tab. Select the model you want to parent to the rig, then Shift+right click until you select the rig.
Hit Ctrl+P again and select “armature deform with automatic weights”. Select the rig, then hit Ctrl+tab to reenter pose mode. Just be careful not to unparent the rig or it will be ruined, and you have to start all over again.

From here on you can have fun bending and rotating your rig and your model will follow the movements.
Practice Activity: How to Make a Basic Low Poly Character Rig
To make sure you get the hang of it, I prepared a simple practice activity that you can use in perfecting your rigging skills in Blender.
I will share to you how to create a basic low poly character rig on Blender.
First, open a new file and import the base model. You can do so by using File > Import. It is also possible to use any other biped model. Right-click and select the model, then press Alt+G to clear its location. By doing so, it will be placed at the center. Now, press Shift+S and then select “Cursor to Selected, to bring the 3D cursor to the origin of the model.
Next, press Shift+A and add an Armature Object. Then, press Z and select the wireframe view you can now view the object inside. To make the armature visible in shaded view mode, you have to click on the Armatures Tab, in the Viewport Display panel, then click “In Front”. You can also rename your new armature object.
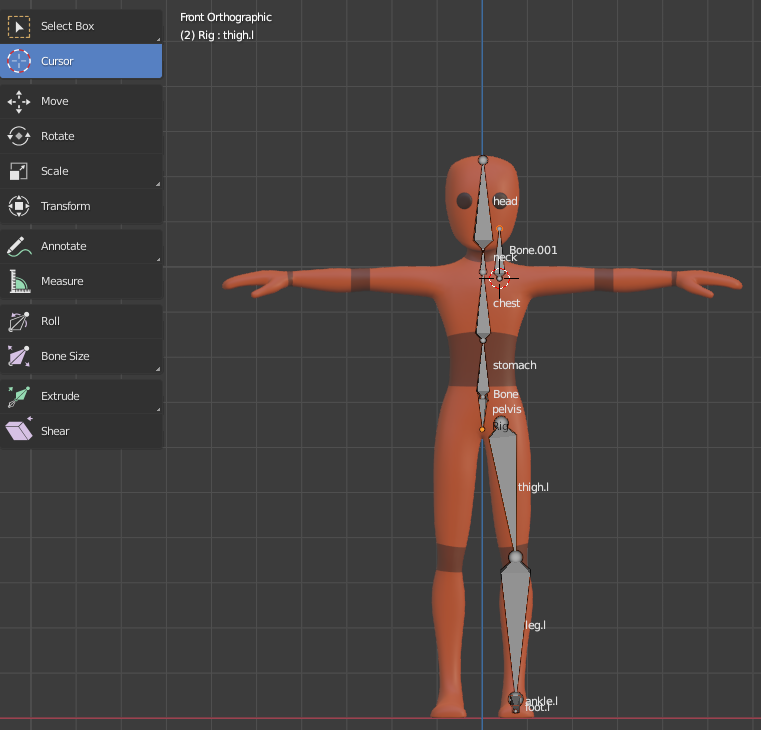
Press 3 on the numpad to get into the side view. Press Tab to enter into Edit mode with the Armature object selected. In edit mode, select the bone by left-clicking and selecting “Move” from the tool menu on the left side. Move the armature a ways back from the model. Rotate it 90 degrees so that the tip of the bone is inside the body. Then, place the bone just around the waistline.

In Edit mode, select the tip of the bone with Right-click. Then press E to extrude a bone. Extrude again a few times for the chest, neck, and also for the head. Next, select the tip of the first bone again and extrude a bone downwards.

Rename all the bones. Select a bone in the edit mode and click on Bone properties, then rename it. You have to do it for all the bones. In the front view, click on the origin of the leg to place the 3D cursor. Press Shift+A and a new bone will be added. Remember to always save your file so that it will not be ruined or deleted by accident while you are working on this project.
Select the tip of the new bone and press G to grab it down to the knee. Press E again to extrude another bone to the ankle. You have to check and see if the two bones are not in a straight line. They should be a bit angled or bent.
Extrude a bone for the foot and another for the toe. Then, right-click on the thigh bone to select it. Rename the bone to thigh.l with an .L extension. This is for Blender to easily recognize the bones, making posing and editing in mirror symmetry much easier. To show the names of your bones on screen, you can click the “Object Data Properties” on the right hand properties column and tick the box for “Names”.

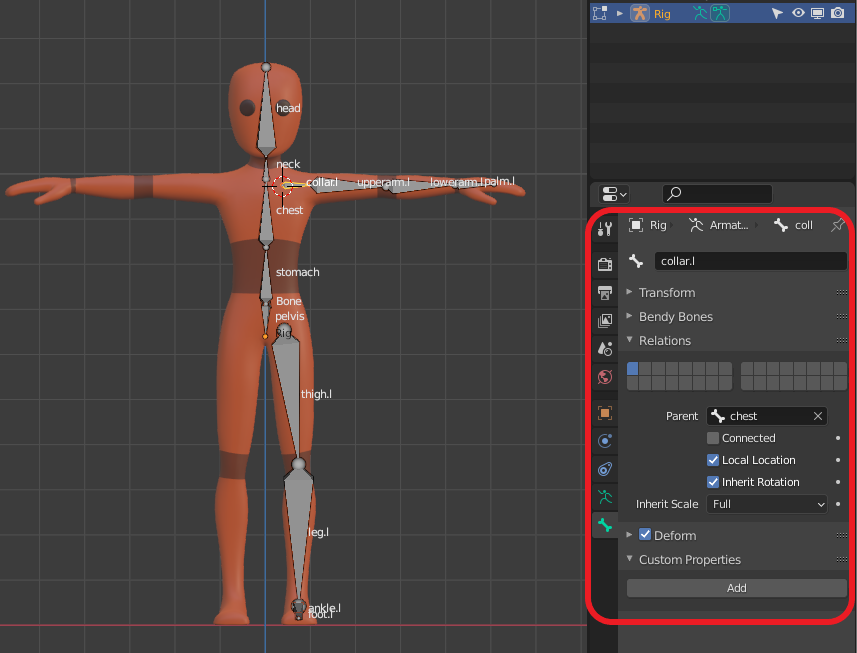
Name the rest of the bones with an .L extension, for synchronization. Select the thigh.l bone and in the Bone properties toolbar, under the Relations panel, set Parent to the pelvis bone. Check if the Connected check box is left unchecked, because otherwise, the bones will be connected together. Alternatively, parent it with the Ctrl+P command.

Select the thigh bone first then the pelvis, then press Ctrl+P to make it a parent. Select keep offset when asked. Then, press 1 on the numpad to get into the Front view. Click the “Cursor” option in the tool menu on the left hand side and left-click on the side of the chest, below the neck, to the point where you want the collarbone to start. Press Shift+A to create a bone.
Next, select the tip of the new bone and press G to move it right on the shoulder. Extrude a bone out to the elbow, then again until the wrist and once more until the palm. Check the top view alignment as well by pressing 7 on the num pad. Rename all the new bones with an .L extension.

Select the collar.L bone and set the Chest bone as its parent, using the Bone properties. Extrude the palm out from the lower arm bone. Press E again to extrude out the finger bones three times.
If your model has fingers, the following two steps are for you to follow.
Select all the Finger bones while holding Shift, then right-click them individually, or by using the B key and drag selecting all of them. Press Shift+D to duplicate the set, then move the mouse to place them on another finger. Adjust the tips to match the finger joints. Then duplicate the set again for the rest.
Rename all the new bones with an .L extension. Next, duplicate a finger bone set for the thumb. Place and adjust the bones to match the thumb joints. Press Z to see the joint loops, then rename them again with an .L extension.
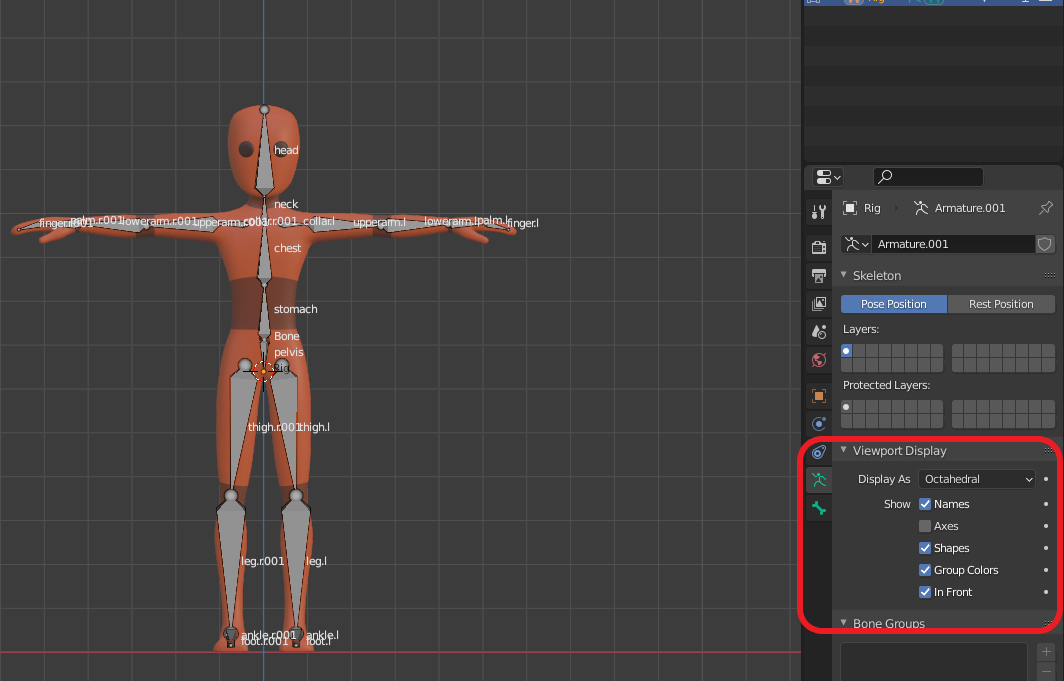
Duplicate and mirror the bones we made on the left side for the right side. To do that, press Tab to exit edit mode. With the Armature object selected, press Shift+S and select ‘Cursor to Selected’. This will bring the 3D cursor to the origin point of the object that is the center of the armature.
Press Tab again to enter into Edit mode, with the Armature object selected. Select all the left bones by pressing B to drag select, or hold Shift and the right-click for multiple selections. Then press Shift+D to make a duplicate. Right-click anywhere to confirm the default position of the new bones. The new bones will be sharing the same position with the old bones. Also the new bones will be the selected ones now.
Change the Pivot point to 3D cursor by pressing this icon located at the top. This will make the 3D cursor the center of deformations like Rotation and Scaling, and so on. Alternatively, you can also do this with the keyboard by pressing the . (period) key.
Click on the Armature Menu, go to Mirror and then finally click on X Local. The duplicated bones will be mirrored with the 3D cursor being the center point of rotation.

Go back to the “Armature” menu and move your mouse to “Names” then choose “Flip Names.” This will replace the .l.001 to .r (right). To toggle view names on or off, check or uncheck ‘Names’ in the Armature properties panel. You can do this to avoid changing all the names manually, one by one, saving you time and effort in doing so.
Press CTRL+TAB to enter into Pose mode (or select Pose mode from the header bar.) Right-click on any bone and press R to rotate any bone and see some action. Select all the bones with the A key in the Pose mode, and press Alt+G to reset the bone’s position to default. Press Alt+R to reset the bone’s rotation to default.

Next we will add an IK setup for the legs. This will help with posing and animation. With the Armature selected (or in Pose mode,) press TAB to get into Edit mode. In the 3D view, press T to toggle on the Tool shelf, and turn on the X-Axis Mirror by clicking this icon:

This will mirror any editing done on either side.
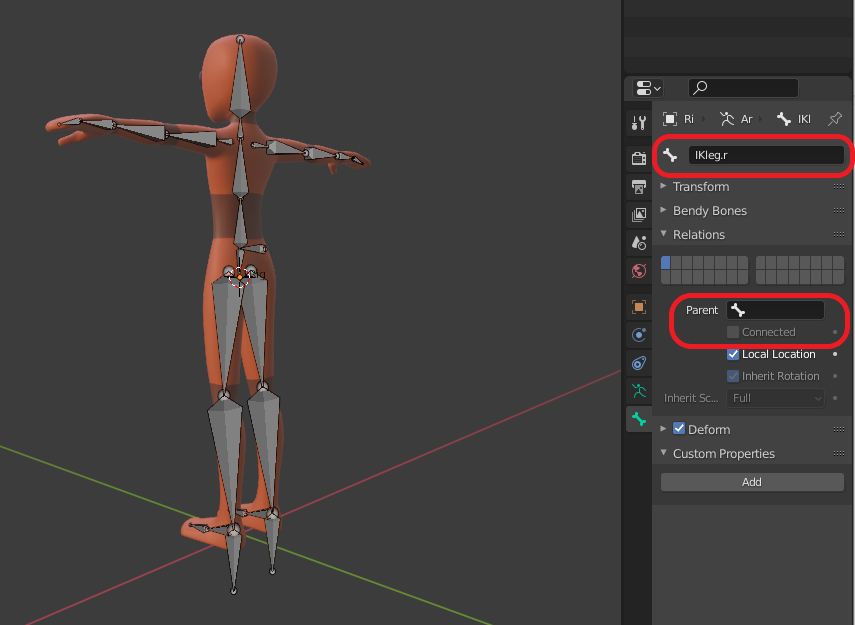
In the side view, select the tip of the leg bone and press E, and Extrude out a single bone. Rename the new bones again. In the Bone Properties window, under the Relations Panel. Delete the name of the parent bone, as we don’t want it to be a child on any. Uncheck the Connected checkbox. This way we can easily move the ik bone around.
For now, let us duplicate the foot bone. Select the foot bone by Right-clicking and then press Shift+D to make a Duplicate. As the X-axis Mirror is on, the other side will automatically be created and edited. Move the bone in front of the knee.

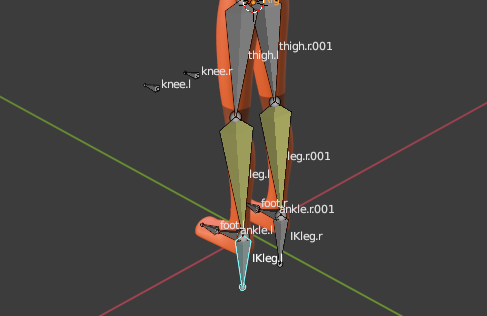
You might need to switch back to ‘median point’ as the pivot point for rotation by pressing , (comma). Name them knee.l and knee.r , make them a child of the ik-leg bones respectively. i.e. knee.l a child of ik-leg.l, and knee.r a child of ik-leg.r.

Press Ctrl+TAB to enter into Pose Mode. Left-click on the lower-leg.l bone to select it. In the Bone Constraint Properties (), add a new constraint – Inverse Kinematics, to the lower leg bone.

Then, first select the Armature object or whatever you named your rig with from the drop down list (or you can type the name.) Then select the Bone (ik-leg.l) in the bone field and set the chain length to 2, so that it effects the last two bones of the chain – lower leg and thigh bone. It is because we use the ik-leg.l bone of the object Armature for the IK target.
Slide and adjust the Pole Angle to turn the weird rotation of the leg back to normal. Now select the lower-leg.r (right) bone and add the Inverse Kinematics Constraint to it. Use Ik-leg.r as the target bone (of the Armature object) and knee.r as the Pole target. Set the chain length to 2 and Pole angle to around 90 degrees.

Press Ctrl+TAB to get into Pose mode and play with the new IK bone. Select the ik controller and press G to move it around. Select the base bone and move it around. To reset the position and rotation, select all bones with by pressing the A key, and press Alt+G to reset the location and Alt+R to reset the rotation.
Enter into Edit mode by hitting TAB and place the 3D cursor on the center. Press 3 on the numpad to get into the side view. Click at the bottom of the feet to position the 3D cursor there. As it was in the center of the object, it will remain in the center when viewed from the front. if not, place it in the center between both feet.
Press Shift+A to add another (Last) bone. Rename this as ‘Root’. This will be the mother of all bones. While animating, you can move this bone to move the whole Armature in Pose mode.

Right-click on the tip of the bone to select it, and press 3 on the numpad to get into the side view. Press G and move the tip forward, holding Ctrl while moving. Select the Base bone and in it’s properties, type the name here (‘Root’) in the parent field. You have to do this to make this root bone a parent of the Base bone and the IK bones.
Do the same for the IK controllers. With that, the basic setup is done. Play with some poses (in Pose mode). To move the legs, use the IK controllers. To adjust the direction of the knees, move the knee bones (Pole targets.)
Press Alt+G to reset the location of the bones, and Alt+R to reset the rotations. The Armature is ready and we can start skinning the model to it. Select the Armature by Left-clicking, and enter into Edit mode with the TAB key. Select the Root bone, and in its Bone properties, uncheck deform. Do the same for all ‘controller’ bones like IK-leg.r, ik-leg.l, knee.l, knee.r and the base bone.

These bones help in controlling the armature and not in deforming the mesh, so we don’t want even a single vertex of the model to get assigned to these bones. The remaining bones will be the ones which will deform the mesh.

Press TAB to exit Edit mode. If you are in Pose mode, then press Ctrl+TAB to switch to Object mode (or select the mode in the header.) Now left-click on the model to select it first, and then hold the Shift key and left-click on the armature object.
Press Ctrl+P to make it (Armature – the object which is selected last) a parent. Choose the ‘With Automatic Weights’ option. This way Blender will automatically assign vertices of the model to the respective bones according to the bone weight and placement.
Click only on the Armature to select it, press Ctrl+Tab to enter into Pose mode. Play around by Rotating the bones, you’ll see that the mesh now deforms along the bones. In the Modifiers Panel, you’ll see that an Armature modifier is automatically added to the model. Click on the model to select it and see its properties.
In the Armature Properties click on the Object Data Properties button, under the Viewport Display Panel. This will display the bones as Sticks. Select the mesh by clicking, and in the Object Properties (under the Display Panel) turn on Wire. This will be helpful while weight painting.

With the Armature in POSE MODE and a bone is selected. Click on the mesh object to select it. Press Ctrl+TAB to get into Weight Painting mode, or you can select the mode in the header section of the 3D view (upper left corner of the view).

Press T to toggle on the Tool Shelf. While in Weight Paint Mode, you’ll see all the tools related to this mode. You can increase the weight of the vertices you would like to be effected by a particular bone. You can still check by rotating and moving the bones while in weight painting. Right click on any bone to see its weight on the mesh.

Check the back side too wherever you paint. You can rotate and experiment while painting to get your desired result. For the joints, the middle loop can be shared with both bones to create a round shape. You can use this on most joints wherever you need roundness.
You can also edit the geometry by pressing TAB to get into Edit mode. Similarly check for all bones. Paint with a 0.0 (or close to zero) weight brush if you don’t want the vertices to get effected, and paint with higher values if you want the vertices to deform. You can also share one vertex with two bones with different weights to have a nice deformation. A good deforming rig depends upon how good the weight painting is.
And there you have it, your character is ready for posing and animation.
Some Useful Tips in Rigging With Blender
Blender is widely known as one of the best tools to use in animation. Still, it would be helpful if newbies would have some tips to use whenever they face a certain situation to make things easier when working with Blender in rigging.
Start With a Model With Pre-Bent Knees
IK joints deform better if you pre-bend them in the model slightly in the required direction. Without pre-bend, the joints will wobble all over the place. Make sure ALL setup is in edit mode and not in pose mode. Get armatures to match the mesh before even touching pose mode.
Resetting a Pose on Blender and More
Hit Alt+R to reset a pose on Blender. This is a simple step to reset the pose, in which a lot of animators use while working in Blender. Remember to do a baseline unkeyed keyframe in pose mode, so that it could have a quick access to the original bone orientations.
Don’t Duplicate, Just Use Instance
Use Alt+D instead of Shift+D to create and render more complex scenes. The new object will share the same mesh data as the original. This step also reduces memory usage. Any changes made to one object will also be applied to the others, enabling to update hundreds of objects at once.
Flat Projection Saves More Time
Avoid UV mapping by using quick-and-dirty flat projection on basic geometry. In most cases, the result will still look the same from a distance. This allows the animator or creator to create complex, realistic objects in minutes. This also saves more time and effort on the end of the creator or animator.
Use Rigify to Rig as Quickly as Possible
Lastly, use Rigify to be able to rig rapidly. This feature is readily available in Blender. It is a very useful tool for getting characters rigged in no time. It also makes rigging a quick activity or task to creators and animators.
All About the Rigify Feature
An In-House Feature for Rigging
Rigify helps automate the creation of character rigs. Rigify is based around a building-block approach, where an animator builds complete rigs out of smaller rig parts, like arms, legs, fingers, and so on.
This also operates on the principle that once a rig is created, there is absolutely no need to use Rigify after use. However, Rigify only automates the creation of rig controls and bones and it does not attach rigs to a mesh.
Some Cool Features of Rigify
There are a lot of features in Rigify, but here are some of the cool and notable ones users swear upon. This includes modular rigging, which builds blocks that can be mixed together to rig any character.
Another feature is the nondisruptive re-rig, or the ability to re-generate a rig without losing previously generated features and animation data. By having shareable animation through all Rigify rigs, this enables everyone to share data between different characters sharing a meta-rig even if they have different proportions.
Lastly, it is ready to go — no need to Rigify once the rig is generated, lessening the extra time and effort animators and creators have to put on rigging a simple character.
How to Use Rigify in Blender
To activate Rigify, open Blender, then go to Edit tab then Preferences then the Add-ons tab, click Rigging then Rigify to enable the script. You can add a meta-rig structure from the “Add Armature” menu. Edit the bone positions to match character geometry. In armature properties, click on the “Generate” button to generate the rig.

Figure 1

Meta-Rigs in Rigify: How Does It Work
In Rigify, meta-rigs store all information required to generate complex rig controls and mechanisms in more simple armatures. It can be found in the Add menu. As of this writing, the current available types include: basic human, basic quadruped, human, cat, wolf, horse, and shark.
All the Amazing Features of Blender
Blender has a lot of amazing features every creator can rely on, regardless of the functions and the purposes of their projects. From rendering to animation and rigging to its user-friendly user interface, here are some of the cool and amazing features of Blender.
Cycles: God’s Gift to Animators in Rendering
It is a powerful unbiased rendering engine, offering stunning ultra-realistic rendering/ Cycles is a ray-trace based production render engine, that has unidirectional path tracing with multiple importance sampling.
Some of its features include a multi-core CPU rendering with SIMD acceleration, GPU rendering with NVidia CUDA and AMD OpenCL, a multi-GPU support, and a unified rendering kernel for CPU and GPU.
Animation Toolset Designed For Small Films
Blender’s animation toolset boasts of the following: a character animation pose editor, Non Linear Animation (NLA) for independent movements, forward or inverse kinematics for fast poses, and sound synchronization as well.
Fully Customizable User Interface for Blender
Blender’s user interface can be customized in a lot of ways. From simply splitting their viewport to fully customizing with python scripting, it offers consistency across all platforms.
There are no disruptive pop-up windows, there is crisp text, including support for hi-dpi/retina displays. It also has a minimal keymap, which allows animators more room to assign new shortcuts to speed-up the workflow. Lastly, its built-in Industry Compatible makes it easier to jump between applications, enabling multitasking for the creators, animators, and other users of Blender.
Pros and Cons of Using Blender
There are several advantages and disadvantages in using Blender, especially in animation.
Pro: Perfect for Every Animator Out There
Blender is a free animation software. It is designed for projects of every kind, from simple video edits to short films. It is also fully-equipped with a lot of key features, upgrades, and updates. Lastly, Blender is constantly improving, meaning it is capable of adjusting towards the growing needs of creators and animators in the industry.
Con: Blender Can Be Overwhelming For Beginners
On the other hand, newbies might be overwhelmed with a lot of features and tools available in Blender. Menus and toolbars are seemingly cluttered and look disorganized. This setup might confuse those especially new with the animation tasks or Blender newbies.
One perk, however: these toolbars are highly customizable to fit any animator or creator’s preferences. You can eliminate or add any toolbars that you might need for your project, without ruining or complicating matters. Blender assures every single user that it will find using the tool very easy, and wants them to use Blender for all of their projects.
Pro: Blender is Great For Animation Purposes
Blender has quality rigging, skinning, fluid simulation, smoke simulation, particle simulation, soft body simulation, and match moving features. Its video editing and composition are also pretty smooth in Blender. This makes Blender perfect for creating animated films, executing visual effects, designing 3D printed models, and developing video games. Specifically, video game development is entirely possible with Blender’s integrated game engine.
Conclusion
Blender is widely considered as one of the best animation tools used by everyone in the animation industry. Its main selling points of being a free and open-sourced platform, as well as its continuously improving tools, features, and upgrades makes this the ultimate choice in the industry. Specifically, its Rigify feature, with the amazing ability of speeding up and maximizing the potentials and capabilities of Blender in rigging, is hands down one of the best choices available for animators, no matter how small or large, or how simple or complicated their productions are.