

Video games have never been as popular as they are today. Game engines made this possible, more so with the improvements they bring to animation and game quality. Unreal Engine is one of the widely-used game engines that you can easily access, being an open-source and downloadable software for free.
How to jumpstart your Unreal Engine 4 journey? You must have an installed copy of the software in order to get started. For beginners without programming backgrounds, its Blueprint Visual Scripting system can be used instead of C++ codes. You can create a simple yet animated Android game and your FPS version using Unreal Editor and Blueprint.
Detailed steps in getting this engine installed in your equipment are discussed in this article. The steps to create a basic Android game and a first-person shooter version without the use of codes are also presented to guide you in the game creation process.
Installing Unreal Engine 4
Working with any type of games will require launching of Unreal Engine 4 (UE4) on your computer. A software copy can be downloaded online for free. Here is a list of steps to get you started.
Step 1: Create An Account With Epic Games.
Before you can install a UE4 copy, you’ll be asked to download the Epic Games Launcher first. You’ll be needing an Epic Games account for this. Go to UnrealEngine.com and click Get Started Now.

Click your preferred license option, either publishing or creator, depending on your purpose. Don’t worry, you’ll start for free under either option.
You will then be prompted to log-in, but click Sign Up to create your account and choose your preferred mode of signing up. Your Facebook and Google accounts are just two among several options to sign up. Just follow the instructions until you reach the Terms and Conditions page. Your download will automatically begin upon clicking the Accept button.
Step 2: Install The Epic Games Launcher.
Once you complete the download, simply run the installer. Then click Install when the dialog box for Epic Games Launcher Setup pops up.
Step 3: Install And Launch The Latest Unreal Engine 4.
You can now log in to your Epic Games Launcher via the account credentials earlier.

Click the Unreal Engine tab inside the Epic Games Launcher loading screen, then the Install Engine button to download. You may choose a location for the download or accept the suggested default. Click Install and just wait for the process to be completed within 10 to 40 minutes. Once done, click the Launch button to use UE4 for your animations.
Creating A Simple Android Game
It’s always best to start with a simple game and then progress to more advanced ones. This section will help you grasp the engine basics and have a quick start. Let’s go over the steps one by one.
Step 1: Prepare all you need for this project.
Aside from the UE4 software, you will be needing Apache ANT, Android SDK and NDK, and JDK for this project. You can simplify the setup process and use CodeWorks for Android here. You’ll be needing sprites for this project. A sprite is simply a 2D image drawing in UE4. Prepare some sprites for your character as you need these for walking and idle animations and for your game platform. There are sprites you can find online for free or you may create them.
Step 2: Create a new project.
You were led to the Launch button in the final step of your UE4 installation. Unreal’s Project Browser display will appear after you click Launch. Click on Games under New Project Categories and then Next. You will have to choose a template from the Select Template screen. For this project, click on the 2D Side Scroller option and then Next.

In the Project Settings page, we will select Blueprint, Maximum Quality, Mobile/Tablet and Starter Content. We will not use the C++ codes for this but build the project instead via the Unreal Editor and Blueprint Visual Scripting system. The Starter Content is a folder of basic assets to kickstart your project. Create your project name and then choose where you’ll save it. Click Create Project to finish this step.

You have actually completed your first 2D game. You may hit Play and click Viewport to have a look at this game.

Step 3: Navigate tabs on display.
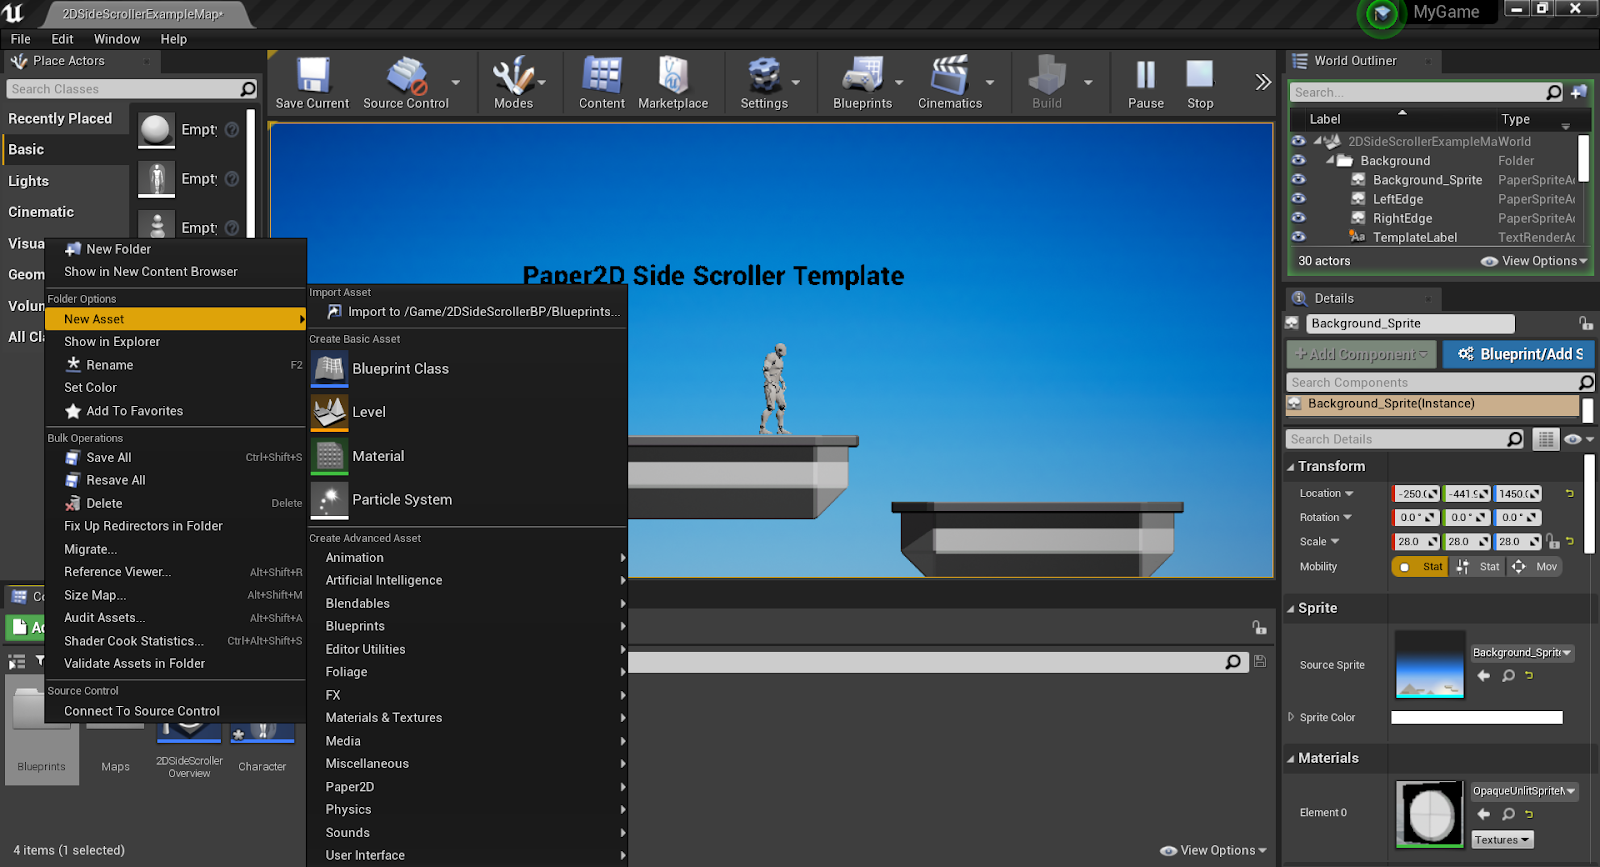
With everything set up, you should have this screen in front of you.

Let’s navigate the tabs first before proceeding to the next step. You just press the WASD keys while holding the right mouse button to navigate. Keys Q and E will be used for up and down directions.
The 3D Viewport gives a total look at the sprites, level layout and other elements of your game. At the right side, the World Outliner provides a list of game elements, which Unreal calls Actors. The Modes window lies on the left and allows a quick change to what you’ll do in the 3D view such as adding visual effects or placing cubes. Your project files can be accessed using the Content Browser.
The Details pane will show information about your chosen Actor or element so you can either edit its properties or learn more about it. You can access your Sprites folder via Content, then 2DSideScroller and Sprites. Flipbook animations will string together multiple sprites for your animated platform or character. You can hold Ctrl and Alt while hovering over the element to see what it does. This function is very handy when you’re starting out.
Step 4: Create a level.
Step 4.1. Create new Actors for your game.
Any game object can be called Actor. For this project, we will utilize the existing Sprites folder. You may drop an image through the File Explorer and right click on it. Next, proceed to Sprite Actions and Create Sprites. Go to your Blueprints folder and right click anywhere. Select Create Basic Asset, Blueprint Class and then Actor. Blueprint Class lets us create different iterations of a single object and is equivalent to Unity’s prefab.
Open an editor by a double-click on the Blueprint Class. In the top left, choose Add Component and then Sprite. Select a new sprite in the Components window, drag your platform sprite and drop it in the Sprite box. You can actually download a platform sprite for free. You should be able to see the tile image as part of your platform.
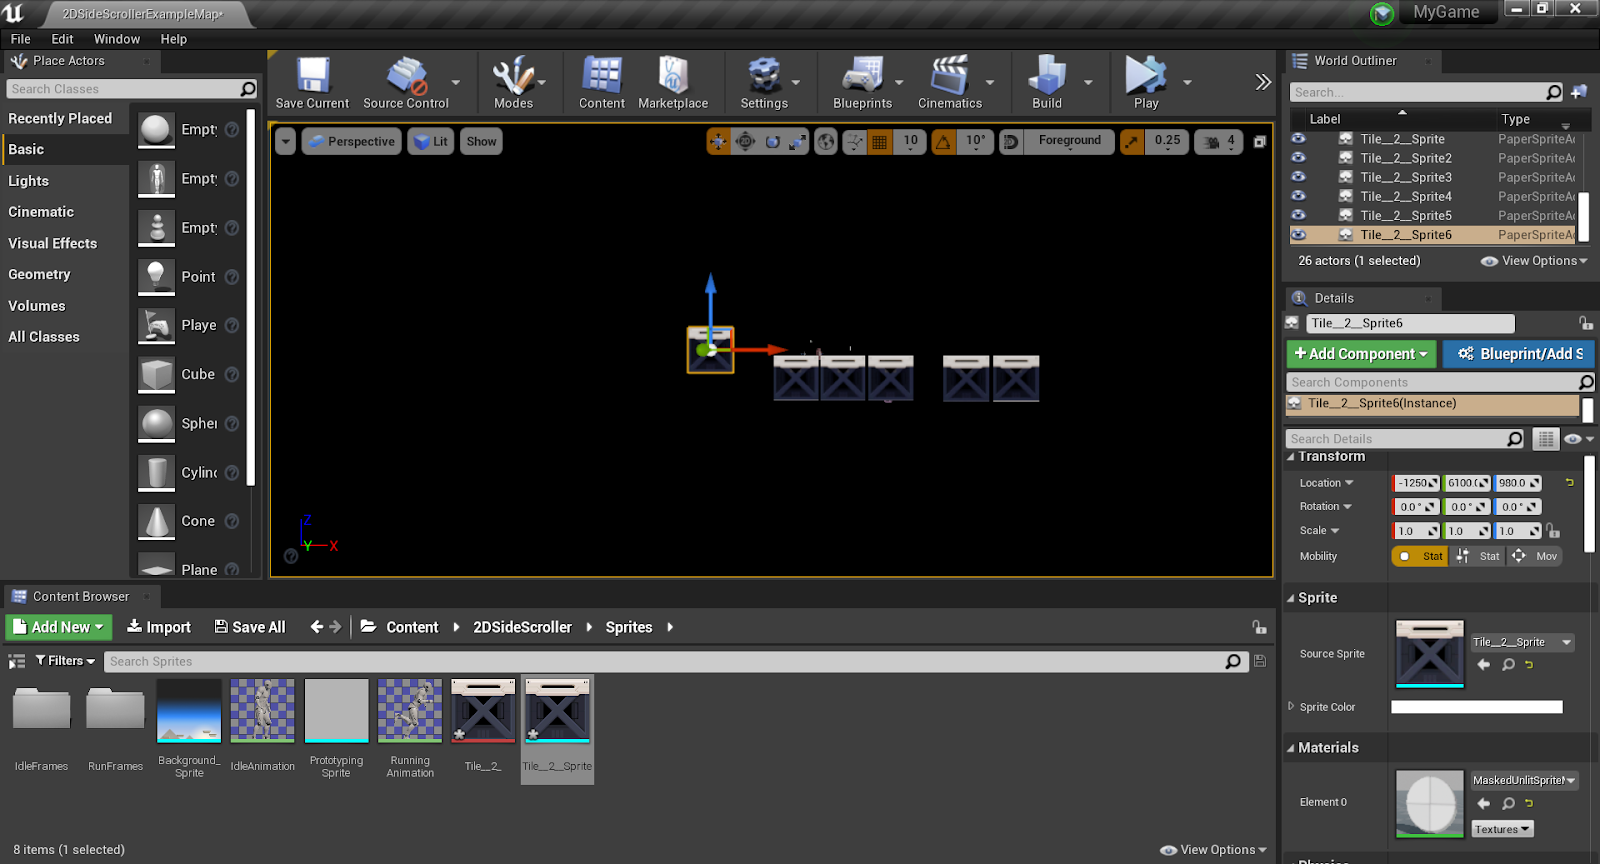
The 3D circle that you see is called a node and serves as your reference point when you drag and drop elements. You may adjust the scale so your sprite gets the best size. Click Save and then return to your game.
Step 4.2.Complete your level.
You can drag and drop elements anywhere in the game. Just make sure to set the Y coordinate to zero when you drop the platform into the level so it doesn’t appear behind or in front of the player. If you noticed, a collider is seen on your platform, that yellow box telling Unreal no player can pass through it, thus, you can jump on it. If you choose Simulate Physics and Enable Gravity boxes, the game platform will fall from the sky and become movable.

You can change background by selecting Background_Sprite at the World Outliner tab and placing your own details in Source Sprite. You may create more actors and then drop them into levels following the steps above. You may also use different sprites, settings and logic for this purpose.
Step 5: Animate the player character.
Finally, we customize this game by animating the main character. We will use some more sprites which will turn into animations later. Remember that you can look for free sprites in a bunch of places online.
Go back to your Sprite folder and create an Animations folder. Place two sub-folders under this and name them Idle and Walking. You will drag and drop character sprites into these folders. To keep things simple, we won’t use a sprite sheet but add individual images instead, naming them by number in an ascending order. You drop these images into relevant folders, choose them all together and choose Sprite Actions then Create Sprite.

Step 5.1. Doing the Idle and Walking animation
You’ll need two images to simulate breathing using a pixel-art, low-frame method.To do this, right click in the given folder and select Animation and Paper Flipbook. Set Idle as your animation name and double click on it to open. Go to the Sprite section and add two keyframes using the + button. You can expand and add two members by hitting the left arrow.
You can now drag and drop new sprites to those windows, or straight to the timeline box that you’ll see below.

Your animation cycles through its frames. If you change the Frame Run Value and type 8, the image will appear breathing. The same procedures will apply to your Walking animation. You can have a higher frame rate and add more keyframes. You can set it to two and 16bit.
Step 5.2. Plot your animations in the Event Graph.
Proceed to 2DSideScrollerBP then Blueprints and click on 2DSideScrollerCharacter twice. A graph will appear with a double-click. We will be using visual flow charts instead of actual codes. If you zoom out, you’ll see the Handle Animation box and the drop-down menus follow after Select. You will find these fields: RunningAnimation and IdleAnimation. Click on them and change them to the ones you just created.

When you flick over to Viewport, find the box marked with Source Flipbook. Select your Idle animation character and replace that box with the character. Under Transform heading at the right side, you can edit the scale to resize your character. Once done, hit Compile and then Save.
Step 6: Run the project on your device.
Proceed to File, then Package Project and Android. Select ETC1. You can now create an APK for testing the game on your device. You need to set up though before you begin. As an advice, remove the Gradle support for this build.
Step 7: Customize the game as you like.
Your project is now done, but you can continue to add platforms, obstacles and animations to your game. Different properties for your Actors can be added if you just play around with graphs. You may add weapon buttons, change jump heights and have enemies following around through the graph. If you wish to add new inputs, go to Settings, Project Settings, Input and then Action Mappings to do so.
Creating An FPS Game
Unreal was first introduced in a first-person shooter (FPS) game, hence it can be used to create your own version. An FPS is a genre where your player uses guns and then experiences the game using the character’s eyes. Let’s explore the steps below to create an FPS game.
Step 1: Create your project, with needed files and setup.
Step 1.1. Save required assets.
Models and animations will be required for this game. If you want to look for your own assets, you can proceed to Mixamo and create an account with them. For this project, you may download and save required assets here.
Step 1.2. Create your project setup.
Include the Starter Content when doing your game setup. Create four new folders in the Content Browser and name them Models, Animations, Blueprints, and Level. Drag all the folders from your downloaded Models Folder Contents to the Models folder in your Content Browser. Follow the same procedure for Animations Folder Contents. When prompted upon import, name the Skeleton as mutant_Skeleton.
Next, drag the FirstPerson folder going to the editor’s Content folder. This is a gun asset made from Unreal’s template project. Click File, New Level and then Default level template to create a new level. Save it as MainLevel in the Level folder.

Step 2: Set up the player.
Step2.1. Create player components.
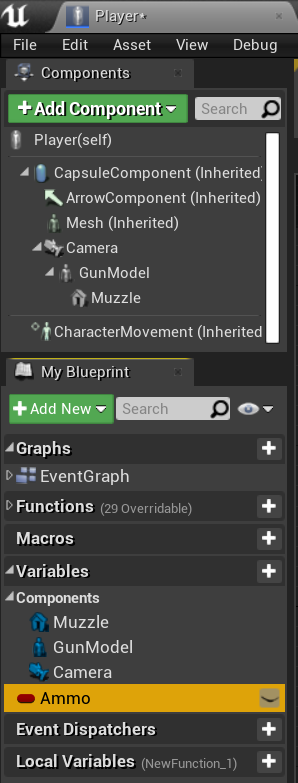
We now create a new blueprint under the parents class of Character. You may call it Player. Double click it so the blueprint editor opens. You will see these components in the editor: CapsuleComponent which is the collider and under it are the ArrowComponent or the forward direction and the Mesh or skeletal character mesh. CharacterMovement is for actions like jumping.


We begin to create a new Camera component, which gives us the ability to see through our player’s eyes. To set the Camera on top of our collider, type 0, 0, 90 in the Location boxes.

Next, create a Skeletal Mesh for the gun and drag it below the camera. Type these values under the corresponding fields: GunModel for Variable Name, 40, 0 and -90 for Location, 0,0 and 90 for Rotation, SK_FPGun for Skeletal Mesh and M_FPGun for Material.


Step 2.2. Create a player blueprint.
We will create another blueprint in the level editor. With Game Mode Base as the parent class, call it MyGameMode. This will command the game on what we want the player to be. Click on the World Settings tab in the Details panel and make GameMode Override as the new game mode blueprint.
Double click on the blueprint to open, then set Default Pawn Class under player blueprint. Click Save, and Compile and then go back to your level editor. Under Edit, click Project Settings, and Input. Create these new Action Mappings: Jump for space bar and Shoot for left mouse button. You will also need to create these Axis Mappings: for Move_ForwardBack, W and S with scales of 1.0 and -1.0 and for Move_LeftRight, A and D with scales of -1.0 and 1.0.

Step 3: Set up player movement.
We need to navigate the Event Graph tab for this. For movements, you will find two input axis event nodes that will plug to an Add Movement Input mode. You may press Play to test this.

For the mouse look, we want our camera to rotate based on mouse movement. To execute this, an Event Tick node plugs to AddControllerYawInput and AddControllerPitchInput nodes.The camera will rotate along the Y and Z axis with these nodes.

If you press Play, you’ll notice that you can look from left to right but not down and up. To change this, you must select Camera and then check the Use Pawn Control Rotation box. To test if you can move and look around, just press Play.
To enable jumping, you need to create an InputActionJump node. This node gets triggered every time you press the jump button. You may try to change a few jump properties, such as Jump Z Velocity at 500 and Air Control to 1.0. You can actually tweak several settings to fine tune the player controller.


Step 4: Create a bullet blueprint.
We’ll create another blueprint and call it Bullet. The parent type will be Actor. In the blueprint editor, build a Sphere Collision component and bring it to the root node so it becomes the parent.
Set Sphere Radius to 10, check Simulation Generates Hit Event box and choose Trigger for the Collision Presets in the Details panel.

Next, we will create a Static Mesh component. Relevant field entries are 0, 0, -10 for Location, 0.2,0.2,0.2 for Scale, Shape_Sphere for Static Mesh, M_Metal_Gold for Material and Trigger for Collision Presets.

In the Event Graph you will see these variables: MoveSpeed, StartTime and LifeTime. Click Compile and set 5000 for MoveSpeed and 2.0 for Lifetime. The first set of nodes will set the start time value in the beginning of the game.
To move the bullet forward, the event tick node will plug to an AddActorWorldOffset node which adds a vector to the current location. Forward direction will be the delta location, multiplied by the move speed. The Delta seconds is also multiplied so the bullet moves at the same speed, unaffected by the frame rate.
The flow will be connected to the Branch node. The DestroyActor node will have Self as Target so the bullet gets destroyed upon reaching the set lifetime.
Step 5: Implement shooting of bullets.
We will implement shooting in the Player blueprint by an integer variable named Ammo. Hit Compile and set default to 20.
Next is to create the InputAction Shoot node, which will be triggered by the left mouse button. With an ammo, a new object will be created by the SpawnActor node. Class must be set to Bullet. Be sure to give an instigator, owner and spawn transform to the SpawnActor blueprint before proceeding.

For Transform, we’ll have a new one, and its location and rotation will be the muzzle and its rotation. For the Instigator and Owner, they will be connected to a Self node. You may subtract 1 from the ammo count and press Play to check if the gun can shoot.

Step 6: Create the enemy.
We will create the enemy with its AI. A blueprint with Character as the parent class will be created. You may call it Enemy. Next is to create a Skeletal Mesh component and input 0,0,-88 for Location fields, 0,0, -90 for Rotation and mutant for Skeletal Mesh. You may also use the TutorialTPP for this. Select the Capsule component then change the Scale to 2. You will have an enemy bigger than the player as a result.

For the Event Graph tab, our variables are Player, Attacking, Dead, AttackStartDistance, AttackHitDistance, Damage and Health. Click Compile and set 300 for AttackStartDistance, 500 for AttackHitDistance and 10 for Health.You will then create the Event Tick node and fill in the properties as shown in the image.

We then generate a nav-mesh in the level editor so the enemy moves. Just search for Nav Mesh Bounds Volume in the Modes panel and drag it to the scene. Set the sizes of X, Y and Z to 1000, 1000 and 500, respectively. You may press P to toggle the visualizer on or off.

Finally, select CharacterMovement and set the Max Walk Speed to 300. Set AttackStartDistance to 300, AttackHitDistance to 500, Damage to 1 and Health to 10.
Step 7: Animate the enemy.
Select Animation and Animation Blueprint in the Blueprints folder. Select mutant_Skeleton or TutorialTPP, click OK and call this EnemyAnimator.

You can open the animation editor by double clicking on the blueprint. You will see a preview of the skeleton on the upper left corner. Our four animations can be seen at the bottom left. For a preview in action, just open them.
In the center graph, make a right click and build a new state machine.

The state machine determines what animation is needed and is a logic collection. Double click the state machine to open it and drag the four animations inside it. For the Idle state, click and then drag its border to each of the other animations. Apply the same procedure to the three others.

We will create the Boolean variables Dead, Attacking and Running to apply logic. You’ll find a circle button next to the transition lines. Double click the circle for idle to run. A new screen will open for you to define the movement logic along this transition. Drag the Running variable in so you can plug it to the Can Enter Transition node. The transition will occur if running is true. Do the opposite in the run to idle transition.
For all transitions, go through and then fill in all respective booleans. Double click on Mutant_Dying state, select it and disable Loop Animation for a single play. Proceed to the Events Graph to hook the three variables to the enemy blueprint. The owner must be cast to the enemy before a Sequence node can be connected. Check the enemy’s velocity for you to set its running variable. The enemy’s attacking and dead variables are to be checked as well.

Head back to the Enemy blueprint and choose its SkeletalMesh component. You then set the Anim class as the new EnemyAnimator.

Press Play and see how it works!
Step 8: Set up attacks on the player.
You will now proceed to the OnSuccess output in the Enemy blueprint to check if you’re not currently attacking. You may set Attacking to True, wait for the attack animation to finish in 2.6 seconds and then set it back to False.
You will see the enemy follow you and attack when you press Play. To do damage, head to the Player blueprint and create CurrHealth and MaxHealth variables. Hit Compile and set both values to 10. Create new functions, TakeDamage and Attack Player.


To trigger player attack, proceed to your enemy animation editor. Double click the swiping animation at the bottom and drag the playhead to where you’ll launch the player attack. Next, right click and choose Add Notify and New Notify. You may call it as Hit. Create AnimNotify_Hit event in the animator graph. A notify will trigger this event. You may press Play and verify if after 10 hits your level resets.
Step 9: Implement shooting of the enemy.
Your TakeDamage function will take DamageToTake as input. You may check for collider overlap in the Bullet blueprint and inflict damage to the enemy. When you press Play, you’ll be shooting the enemy and after a few shots, the enemy should die.

Conclusion
These game projects may be too simple for you but are sure to support your progress towards complicated ones. The key is to be familiar with UE4’s features to handle more complex tasks with ease and confidence. Building simple games will help you develop that over time. Just take your time to learn the process and create basic games today while enjoying the process.