
The movie industry has made the use of visual effects almost a film requisite. As visual effects tend to vary based on needs, so is the software that can work for production and VFX enthusiasts. Lightworks is a popular, professional editor and a proven film master that has worked well with studios for releases such as that of Batman and Pulp Fiction.
How to add visual effects in Lightworks? Visual effects are possible with Lightworks tools. You just click the ‘VFX’ tab at the top center of the window, then the ‘+’ sign beside the ‘Settings’ tab for preset effects. Different effects for categories such as Text, Colour, and Matte can be easily applied to your clips with a double-click.
An understanding of Lightworks’ pros and cons can help evaluate your decision to use it for crafting Hollywood-quality films at home. Twelve easy steps to add visual effects in Lightworks are extensively discussed here in this article to guide you and perhaps, jumpstart your editing career too.

Lightworks Software Essentials
Before downloading a free copy of Lightworks program, in case you don’t have one yet, it is important to begin with the end in mind. Video quality depends largely on a software’s functionality. Let’s understand what Lightworks is from this perspective.
What Lightworks Is

With decades of existence, Lightworks is an Academy and Emmy award-winning non-linear, professional-grade editor. It has successfully collaborated with studios for large-scale feature films including The King’s Speech, Batman and Pulp Fiction. Lightworks has always been a turnkey solution for productions until it became a freeware in 2013.
Lightworks was made available to the general public as free download for Windows users beginning 2013. It is the only professional, cross-platform, and open-source video editor with its Linux and Mac compatibility.
Pros
Free And With Impressive Import Formats
Professional editing is now accessible to everyone with Lightworks’ track record in Hollywood. You just have to learn the basics of Lightworks operation to get started. A wide range of import formats is available in its downloadable free copy making Lightworks a good choice for you.
Designed For Speed And Precision
Lightworks is a powerful application with ready-to-use tools for speedy and precise edits. Trimming tools for instance, are comparable to that of Avid, a default software when it comes to industrial purposes. If you’re familiar with Avid, you can expect a similar feeling in Lightworks’ overall performance. Keyboard controls are also natural and intuitive.
Powerful And User-friendly VFX Panel
Lightworks is able to pull off several amazing movie magics with its user-friendly VFX panel. You can find a wide range of effects that’s built-in and community-made. The program has been and is continually improving over time through newer versions launched in the market.
Cons
Surprisingly Unstable
Despite its multiple versions, it is a common experience to encounter frequent crashes and software bugs when working with Lightworks. You can be locked out of your project if you’re not extra careful. In addition, a deadline-focused production may be prone to delays with an unstable program condition.
Export Limited To 720p For Free Version
The free version, however, only allows for a 720p export quality. There is no full HD unless you opt for Lightworks Pro. Trial or paid version is available for Lightworks Pro. There is also no 4K pixel support in your free copy.
Difficult For Complicated Effects
Lightworks is pretty good for simple effects. Even so, you still need an ample time to learn the basic operations. You can possibly imagine how much time and effort it will take you to master Lightworks for complicated effects. Its node-based effects editor, though versatile, can be hard to route properly.
Visual Effects: Elements And Process
There are a number of steps to add visual effects to your videos via Lightworks. Going over these steps is a must to produce stunning clips. While visual effects may have different forms, here are 12 easy steps to help you begin the process.
How To Add Visual Effects
Step 1. Set the vertical red line properly.
Before you can add an effect to your chosen clip, make sure that the vertical red line is in place. Place the line on any part of the clip you wish to add those special effects to.

Step 2. Navigate through the VFX tab.
The VFX tab is found at the top center of the user window.


Go to the VFX tab and you will see the clip in the media viewer. If you have not yet added a clip to the current sequence, you can easily drag it from your local drive or from the Library under the ‘Edit’ tab or wherever it’s saved, to the sequence in your media viewer.
On the left-hand side, you will see the ‘Settings’ tab where the color correction panel is located. On the bottom right is a timeline, which is similar to the timeline you can see under the ‘Edit’ tab. You can spend a few minutes playing around using the color correction sliders and color wheels to see how different colors can affect the look of your clip.
The arrows in the upper right corner of the timeline will give you options to either Undo or Redo your work if you find it necessary.
Step 3. Choose desired effects from the preset list.
To the left of the ‘Settings’ tab, you will see a ‘+’ sign. Click on it to view the list of pre-set effects that you can choose from and later add to your clip.
When you click the ‘+’ sign, you will see categories of effects which include ‘Colour’, ‘Matte’ and ‘Text’ and a few others as shown in the image below.The yellow star on the left corner will generate the list of your favorite and frequently used effects once you click it.

You can select whatever category is applicable for you. If you choose the ‘Colour’ tab for example, a list of built-in effects will be given to you.
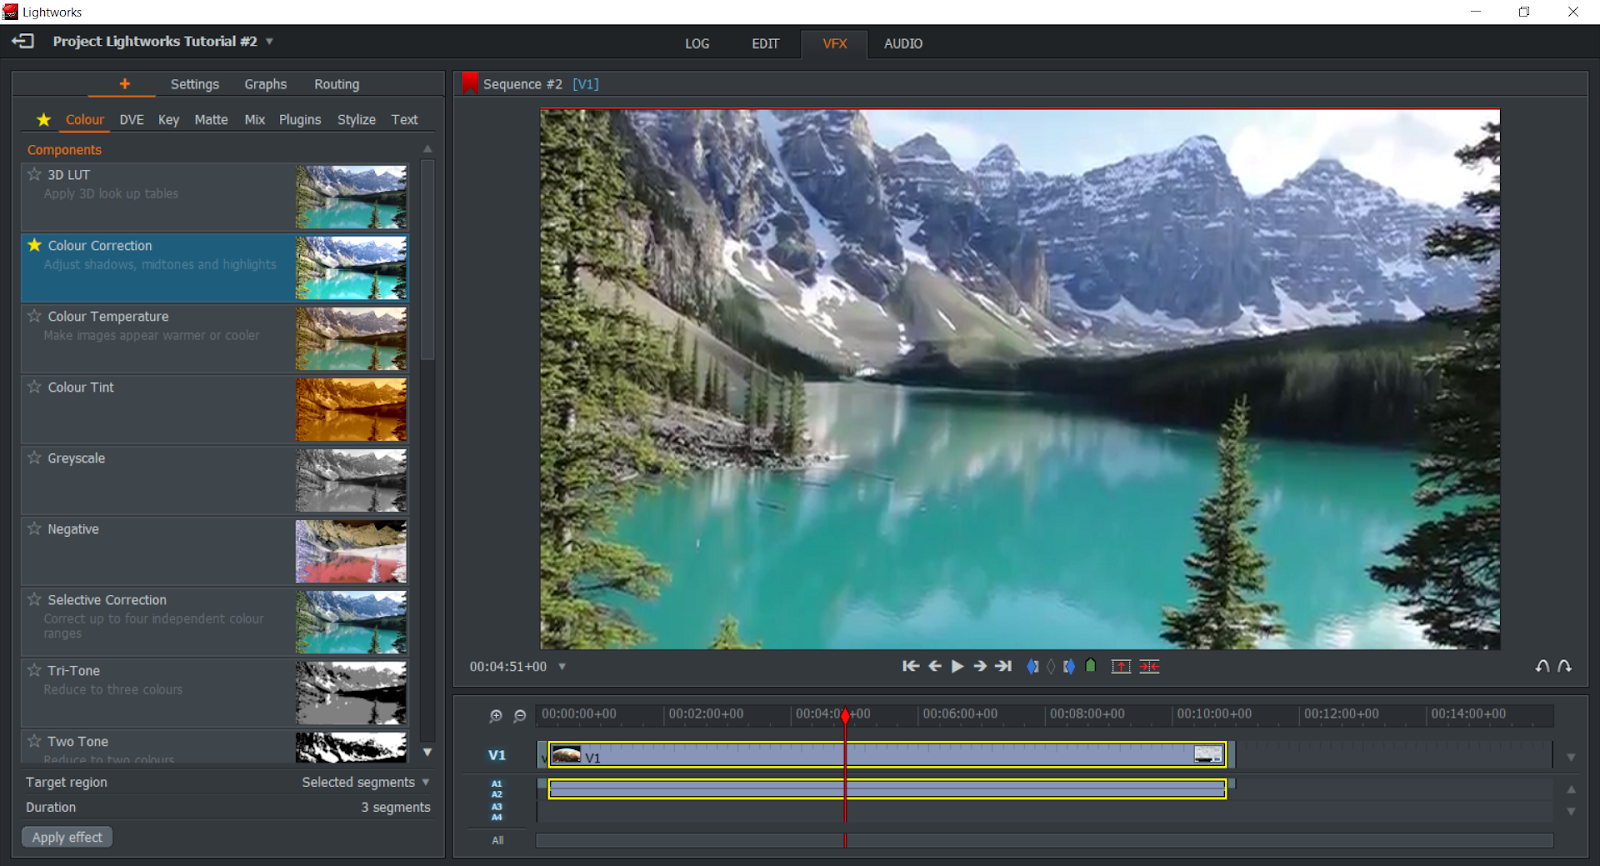
You will find different effects under your chosen category. Double click on your desired effect and it will be applied to your clip. You will see the changes instantly through the media viewer.
After this, you will be reverted back to the ‘Settings’ tab and a control panel corresponding to your chosen effect will appear.
Step 4. Navigate through the control panel.
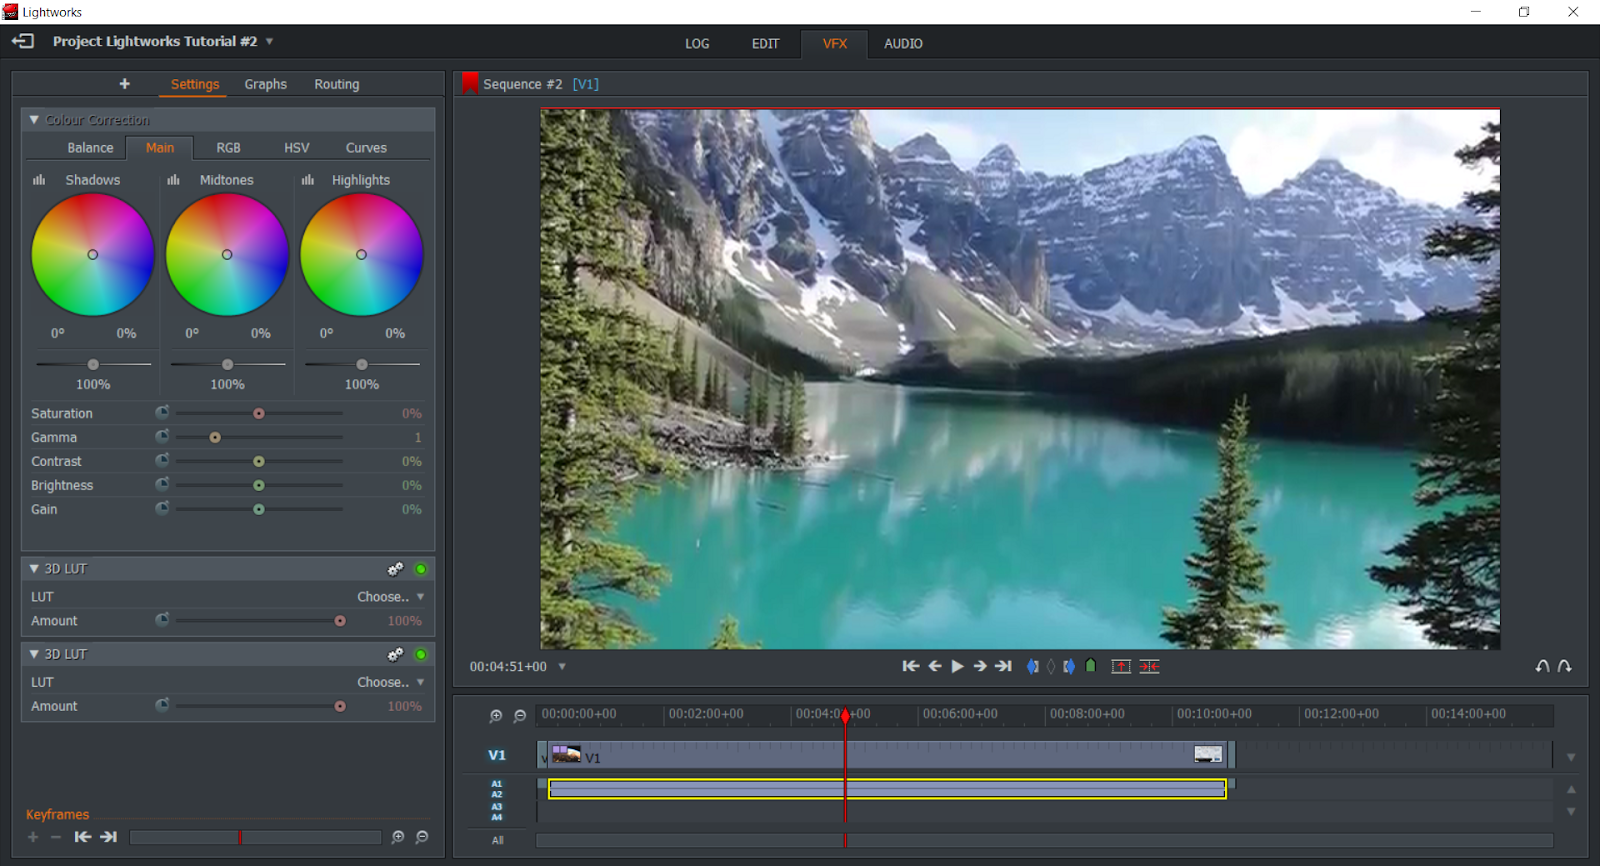
As in the image above, the control panel that corresponds to your chosen effect allows you to explore available options. Colour correction can also be seen in the control panel under ‘Settings’. The control panel may vary as it depends on the category and effects that you clicked.
If you think the effect is not right for your clip, you can click on the gears icon again, then click ‘Reset’ and ‘All’ from the given menu. Now you can click the ‘+’ sign again to view other effects.
Step 5. Add your frequently used effects to ‘Favourites’.
Click on symbol beside the name of the effects you’d like to use in the future. When it turns to yellow like this
, it means the effect has been successfully added.
How To Add A Text Effect
Step 1. Go to the ‘Text’ category under the ‘+’ sign.
Click on the ‘Text’ category to see available pre-set effects. Double click on the chosen effect and you will be led to the ‘Settings’ tab.

Step 2. Type the required info.
You might be asked for the title, person or place name, and job description among several effect options. On the left section, type the data asked from you and you will see how it looks like from the media viewer at the right. Sample texts in the heading and subheading boxes are normally seen before you can make any edits.
Step 3. Use the given tabs to change details.
The ‘Font’ tab provides options for font type, including bold and italic features.The ‘Face’ tab helps you pick a color or a color combo for your text. The ‘Position’, ‘Shadow’,‘Outline’ and ‘Effects’ tabs will assist you in their corresponding features. Never forget to click on the Undo or Redo arrow if necessary.

How To Create An Effects Track
Step 1. Place the vertical red line in a blank area.
This is to create an effect using its own independent track, not over a video clip. The red line must be set in an area with no clip. You will know this because a black screen appears on the media viewer.

Step 2. Repeat the steps to create text or other special effects.
Please go back to the previous paragraphs for the steps in adding text or other effects.
Step 3. Go to the ‘Edit’ tab to check the effects track.
The ‘Edit’ tab is located at the immediate left of the ‘VFX’ tab. You will see that the effect has its own track under the name ‘FX1’, just above the video track.
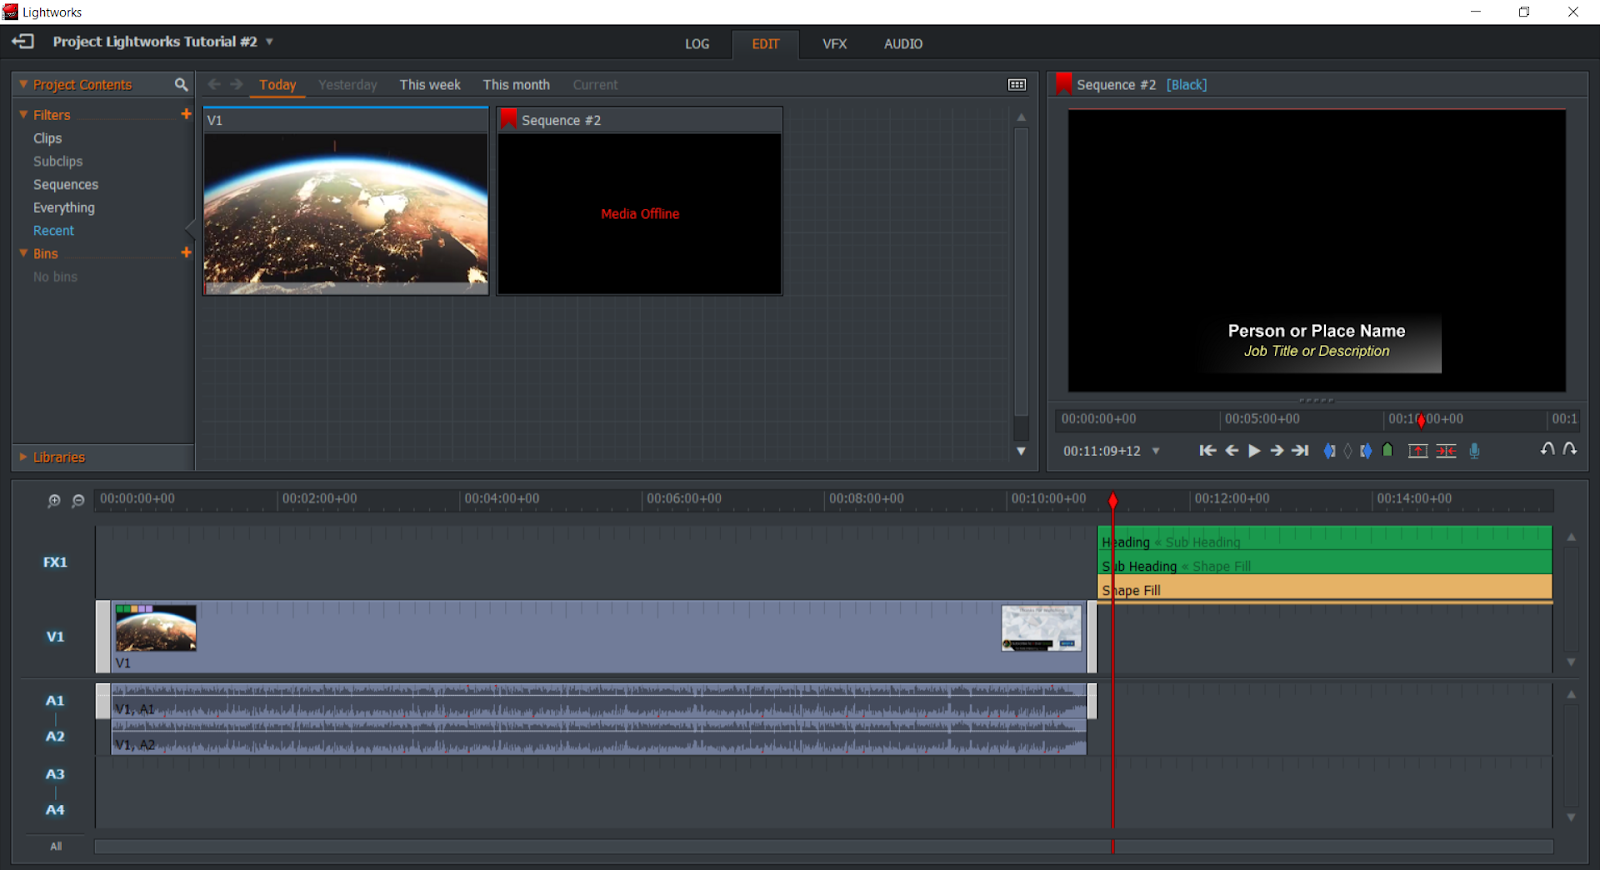
Step 4. Hover over the edges and trim or stretch as necessary.
After seeing that the effect has its own track, hover over the edges until white brackets appear. Click on those brackets so they turn yellow.

You can trim this to make it shorter or stretch if you need it to be longer.
Conclusion
Editing raw footage or video clips may not be as simple as it seems, but you can begin by exploring Lightworks and following the tutorial above. Some people find the user interface quite intimidating but a few intentional clicks will stir that courage from within. Never mind the time as you will always need hours or days to master a craft. You just have to muster yourself for a quick start. Always bear in mind that all pros began from scratch. Nobody is an exception.