
Lighting is an integral part of filmmaking, and when working in visual effects, this is a part that is given much thought and consideration as well. In fact, lighting is not only done in live action shoots, but is also part of the visual effects production process, with an entire department usually dedicated to it.
When we talk about lighting in visual effects, especially for those who wish to achieve a seamless and realistic look alongside the live action footage, the lighting artist will need to have an understanding of how light behaves in real life in order to recreate it in the software they use. How far or close does a light need to be? In which direction should it face? These are questions that they could ask themselves.
In this article, we are going to talk about lighting, the basic three-point lighting setup, as well as some other lighting techniques and how to do them in order to achieve different effects that would contribute to the overall concept and story.
Why Is Lighting Important In Visual Effects?

In visual effects and film, lighting is one of the most important aspects. Everything we see, even in real life, is dictated by the type of light that is available and how it hits the objects or environment around us.
The same is true for lighting in the media we consume. It guides the audience on where to look at or the points of interest in a particular shot. Light, depending on how it is manipulated, could evoke different moods and emotions that best serve the story.
Art and media have conditioned us in associating different lights and colors with different moods, so when we see a scene with large, looming shadows, we feel uneasy. When we see a brightly lit scene, we associate it with happiness or beauty. When we see a face lit from below, creating shadows on their face, we feel scared, and so on.
Lighting plays at these image associations that we have developed throughout our lives in order to enhance our experience when viewing film, TV, commercials, and video games.
Most importantly, good lighting is what grounds a make believe story to reality. Good lighting maintains the audience’s suspension of disbelief, which makes the work more immersive and amplifies the effect that the film or project aims to achieve.
How To Achieve Good Lighting For Visual Effects
Lighting for visual effects is an art in itself, and requires extensive knowledge and skill in order to achieve good results. Aside from an eye for detail and design, it requires technical knowledge of the software to be used, as well as of how light behaves in different setups and situations, and how to manipulate them in order to achieve the level of realism desired.
Here is a basic workflow in lighting a visual effects scene:
Have A Good Understanding Of Lighting Principles
Lighting for visual effects is very similar to lighting in real life, live action sets. You will need to have a basic understanding of how different lights work, and what effects they produce. Different shooting situations will require different lights.
- Does the project require soft, bright light?
- Or do you wish to produce bold, dark shadows?
- How dark is the set?
- What light types and sizes will you need?
- Will you need any special colored lights?
- Do you want the light to be warm or cool?
- How could you manipulate the color temperature?
- How can you add shadows?
These are questions that could apply both in live action lighting and in lighting for visual effects. The methods may be different, but they aim to achieve the same results.
As a lighting artist for visual effects, aside from learning the principles of light, make sure to know your software of choice. This will be your lighting kit, and in order to create your perfect lighting setup every single time, you will need to learn how to maximize the tools that you have at hand.
Assess Your Footage
Before you start applying any of the lighting techniques you may have, the first thing you need to do will be to assess your footage. Watch the material that you will need to work with, and take note of any important details you need to consider when working on its lighting.
If you have access to the information, ask the production team for any notes on how the scene was lit when it was shot. This will give you an initial idea of how the lights were set up, and you won’t have to spend as much time trying to figure out how the scene was lit.

If you do not have access, look at the footage carefully and note where the lights and shadows are, and try to plot how the lights were positioned. Is the scene bright or dark? Will you need to digitally place any shadows?
Place Your Lights
When you have identified an initial lighting layout, place your virtual lights on your 3D space, and position them accordingly. This 3D space has already ideally been made by the matchmover earlier on in the visual effects process, so you need only work with adding the lights and shadows.
If the footage is lit enough to produce visible shadows, you may need to add a plane parallel to the ground in order to show any shadows. You may place additional objects in order to produce the shadows needed for the scene.
Remember that lighting for visual effects varies case to case. You do not necessarily need to copy the lighting setup that was used on set while shooting the live action footage. Lighting for visual effects seeks to enhance and make the scene look more alive and realistic.
Due to having more control over the environment you are working with, you can “cheat” from time to time if you believe that it serves the scene and your setup does not look overly fake that an audience member would be jarred from the overall scene.
Make Necessary Adjustments
It would be very rare to get perfect lighting for your scene in one try, so more often than not, you will need to make some adjustments in order to make the lighting look more realistic.
You could change up your lights’ size, shape, color, and distance to produce different effects. Go back to what you know about the principles of light and how it behaves in real life. You can change your light to be farther away from your subject, or add a reflector to the side in order to produce a softer effect. You could produce shadows by adding objects in front of your light and moving it around until it looks good to you.
Every scene is lit differently, so take your time for some trial and error until you find a setup that best lights your computer generated scene. Over time, this will become an easier process as you work on more lighting projects and gain experience.
Test Your Setup
If the computer generated element to be added to the scene is ready to use, place it onto your setup and test it out. If you do not have one yet, you could use another object, although you may need to make some final adjustments after the computer generated element is ready to be sure of the quality of your setup.
Assess what you have made. If you do not find any mistakes or inconsistencies, then you are done! If not, repeat the steps and make further adjustments until you are satisfied with the result.
Types of Lighting
Lighting has been an important aspect of visual and performing arts, from painting to theatre, and has become an integral part of photography and filmmaking since its inception. Due to its rich history, lighting artists have developed different lighting techniques to achieve different effects.
It is important to know about these lighting techniques as a visual effects lighting artist since what you may seek to emulate in your software could be a variation of one or more of the techniques mentioned below, and being familiar with these will help you identify lights and lighting setups when you see them in the footage you work with.
Here are some of the most commonly used lighting techniques in film:
Three-Point Lighting Setup
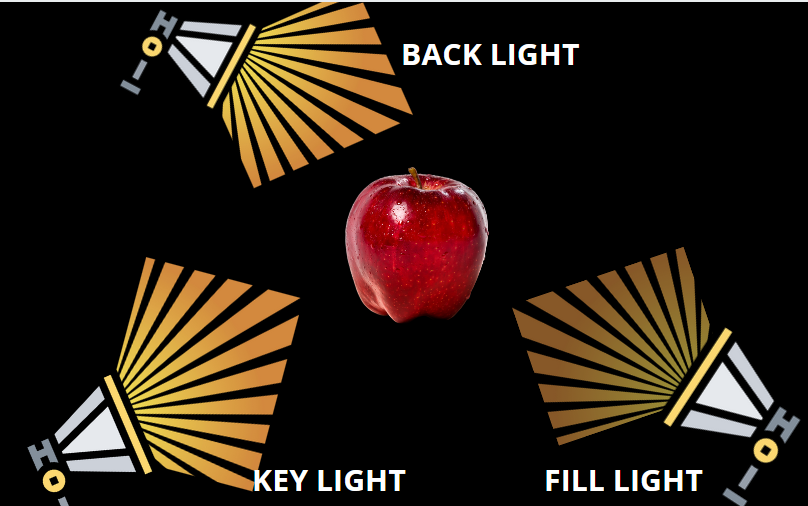
This is one of the most basic lighting setups used in cinematography and photography, which lights the subject clearly and with dimension. It consists of three lights: the key light, the fill light, and the back light. Playing with the brightness and positioning of these three lights will produce different effects. Many lighting setups we see in the media we consume are often variations of this particular lighting setup.
Key Lighting
The key light is the main light of the subject. It is most often the brightest light used in a scene, and it is usually placed slightly on one side of the subject, creating a slight shadow, although it could technically be placed anywhere, depending on the effect you wish to achieve. This is arguably the most important light in any lighting setup, and is usually the first one to be placed.
Fill Lighting
The fill light, as its name suggests, fills up the shadows that may have been created by the key light. It is often less bright than the key light, and serves to eliminate any harshness to the scene. It is usually placed opposite the key light.
Back Lighting
The back light is a light usually placed at the back and above the subject. It is used to separate the subject from the background, especially if they are of similar colors. The light creates a bit of a halo around the subject, making for a more three dimensional feel to the final shot.
Other Cinematic Lighting Techniques
The following are other cinematic lighting techniques, which are used to achieve different looks and evoke different moods that the film may wish to portray. Do remember that these are not cut and dry techniques. They can be and are often used together or in combination with the three-point lighting setup, or with each other. You can play around with different lights and setups to achieve your desired look.
Natural Lighting
Natural lighting is a type of lighting which makes use of whatever light is available, usually from the sun or moon. The sun especially can be a powerful light source, not to mention that it’s free, but it is not one that you could directly control. If you wish to make use of natural light, be sure to plan accordingly, since natural light varies widely as the day progresses.
“The Revenant” for example was shot with natural light only to make the film feel closer to the nature it depicts.
High Key Lighting
High key lighting is a variation of the standard key light that we have discussed in the three-point lighting setup. High key lighting is brighter, and when used with the fill light and back light, it produces minimal to no shadows. This type of lighting could evoke feelings of positivity and an almost clinical brightness, making it the lighting technique of choice for many advertisements, TV shows, and music videos.

Low Key Lighting
Low key lighting is another variation of the standard key light, and the opposite of high key lighting. While high key lighting is bright and positive, low key lighting aims to look darker, and emphasizes the formation of shadows. This type of lighting looks ominous and suspenseful, making it suitable for thrillers and horror films, or any project dealing with dark and serious subject matter.
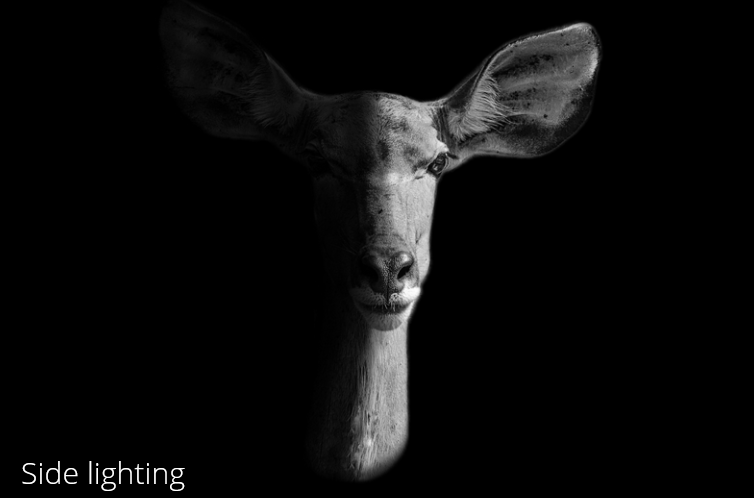
Side Lighting
Side lighting, as implied by its name, lights the subject from the side. A side light could be used with a very soft fill light, or by itself, in order to create more intense shadows. This type of lighting creates very dramatic shadows and emphasizes the subject’s contours. This effect is often called chiaroscuro, creating ominous, dramatic, dark images.
Practical Lighting
Practical lighting makes use of lights that are visible in the scene or shot. Examples are light bulbs, lamps, televisions, candles, and cell phone screens. These lights do not really produce strong, reliable lighting by themselves, but in combination with other lights, practical lights could add a lot to the ambience of a shot.
Hard Lighting
Hard lighting is produced using direct sunlight or a small, powerful, but distant light source. This causes some harsh shadows, especially without the use of a fill light. Depending on where the light or subject is positioned, it can produce unique effects due to the emphasis on textures and edges. This type of lighting could heighten mystery, drama, and suspense.

Soft Lighting
Soft lighting, also known as the “beauty” light, is the lighting technique opposite of hard lighting. It makes use of a brighter, larger key light, and a heightened fill light. The large light illuminates the subject evenly, producing a shot with minimal shadows, making it look bright yet balanced and a bit more natural.
Bounce Lighting
Bounce lighting is a lighting technique where instead of lighting the subject directly, the light is reflected or “bounced” off from a stronger light source onto a reflector and then towards the subject. This creates a large area of even lighting, and minimizes any harsh patches of light or shadow, making for an even look.
Motivated Lighting
Motivated lighting is artificial lighting that is manipulated in order to enhance existing natural light or practical light. An example would be adding some lights in order to make a lamp look like it is emitting a brighter light than it actually is and illuminate a wider area. It is manipulated by using colored gels, filters, reflectors, flags, or other equipment in order to make it look natural or to achieve the desired effect.
Conclusion
Lighting in general has had such a wide history and is used in many art forms, and although requiring different methods and technical skill sets for different areas such as theatre, film, and visual effects, it ultimately has the goal of creating relatable, believable, and moving images for its audiences. To be a lighting artist for visual effects, you will not only need to learn how to operate and use your software, you also need a basic, real life understanding of how light works and behaves. A good visual effects lighting artist, although working with computer generated images, could make the most fantastical, out of this world elements look like something we could potentially see in our day to day lives.